A painter understands the power of a picture frame. The right frame enhances the art and the wrong frame detracts from it. The same principle applies to 3D model building.
As an artist, I’ve learned to see composition as an integrated whole rather than a collection of individual pieces. Much of the conversation about layout design tends to focus on the individual pieces. We obsess over track planning and benchwork, scenery and operation as separate entities. Cameo design considers all of these elements together to create a cohesive, thoughtful showcase for modeling. It’s an approach that I find very satisfying.
Construction
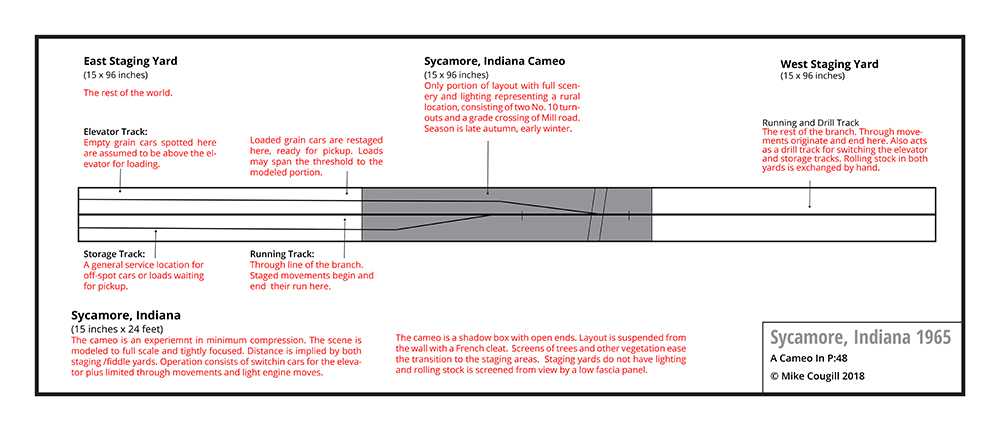
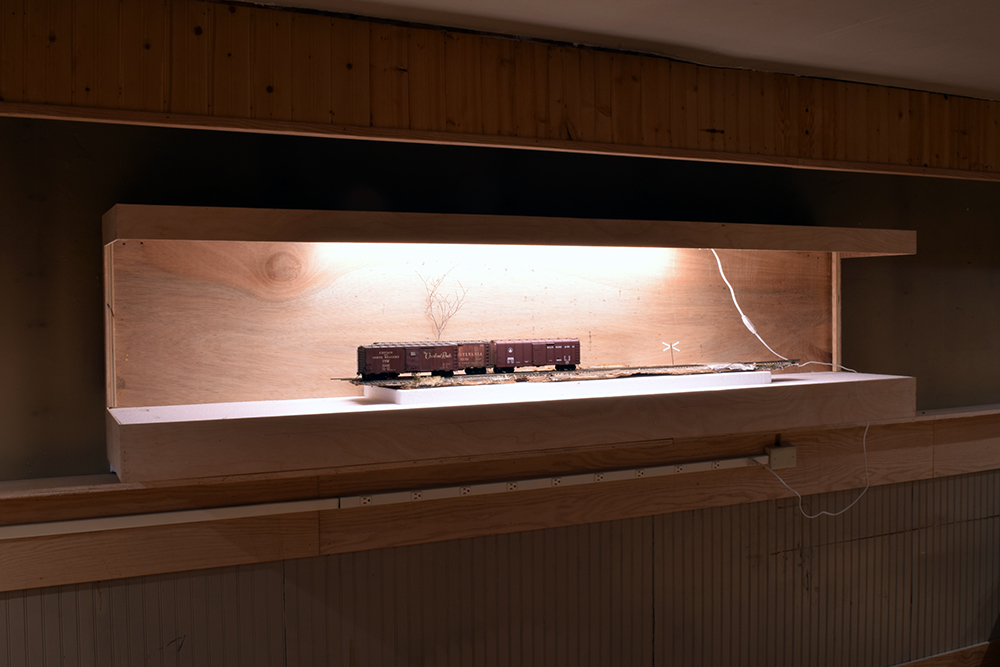
I want lightweight construction that is easily transportable and suited to a variety of room spaces. I should note that while I’m using UK exhibit layout design principles and methods, I don’t intend for this layout to travel. My primary goal is a self-contained package that can be moved intact if needed. To that end, I built a box of quarter-inch plywood around a piece of 1-1/2 inch thick Styrofoam.
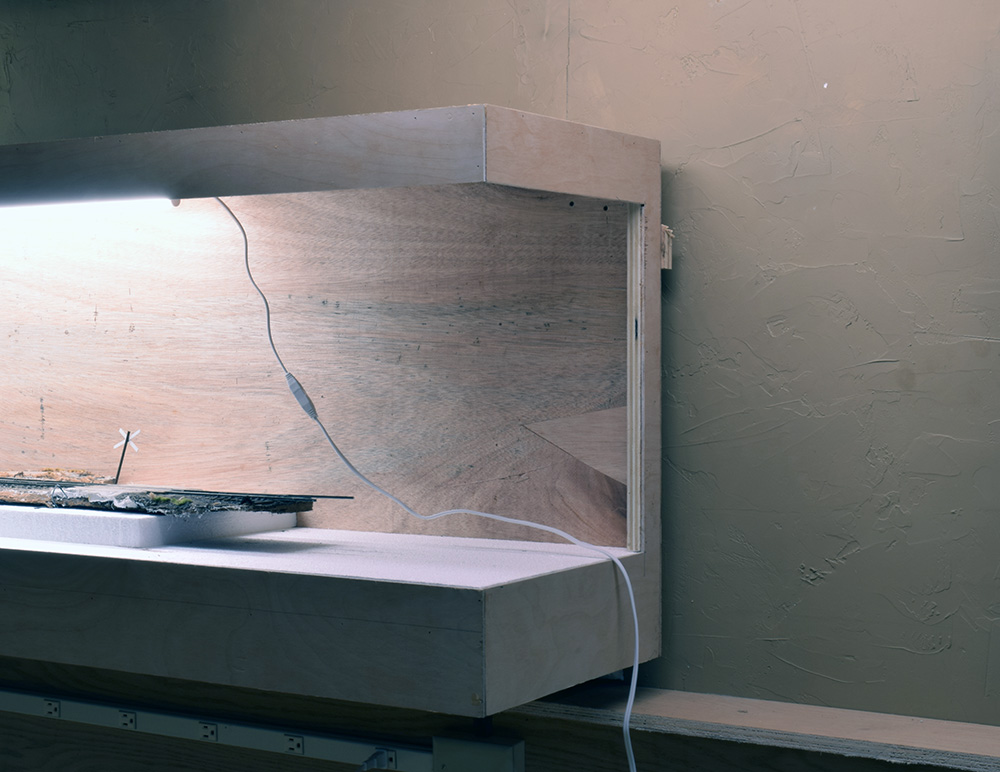
Nothing fancy, just a simple box. I left the ends open this time. The hanging rail for the adjacent staging module isn’t installed yet.
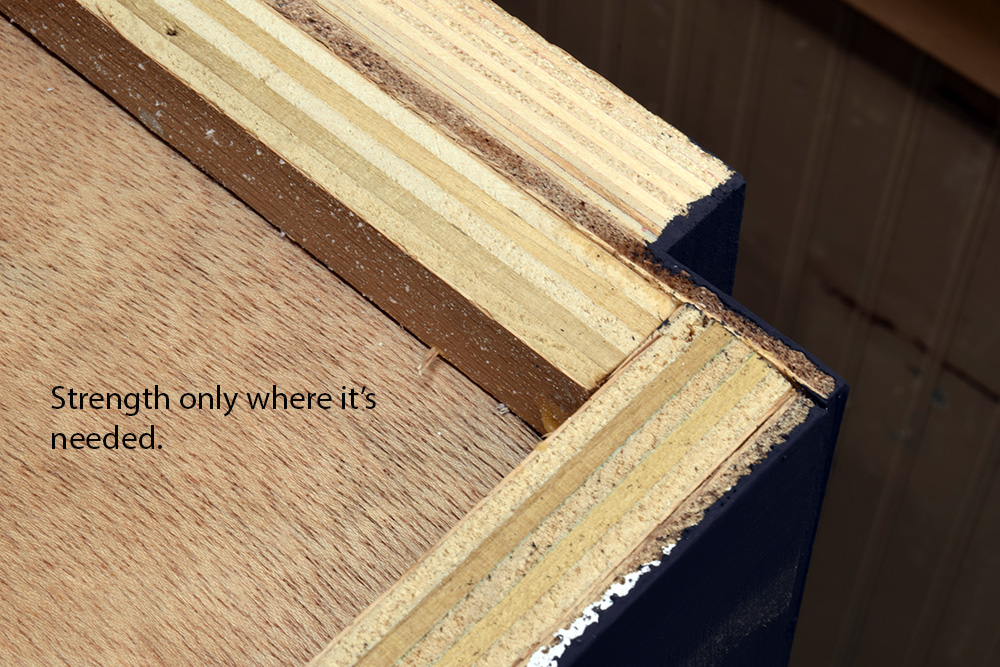
Styrofoam and thin plywood may sound flimsy but there is plenty of strength in them. I only used thicker stock where it was needed most such as corner blocking, which was both glued and nailed. Along with the Styrofoam base, the back and top panels provide shear strength. Adding a top panel stiffens the small cross section of the lighting valance and directs the light downward where it’s needed. The C shaped end panels are cut from one piece for greater integrity and strength.
I chose good quality birch plywood that yields a smooth finish when painted plus, it’s a joy to work with. I chose eight feet for the length of the cameo because it fit better with the scene I planned. The Styrofoam panels are four feet long and I considered modules that length, but I didn’t see a good reason for the added complication of more section joints. Since I only plan to move the module occasionally, the length isn’t an issue.
The depth of the module comes from the precut foam panels. These are available in various thicknesses and come in a package of six sheets, sized to fit the standard 16” on center stud bays in a wall. The width feels perfect, even for quarter-inch scale, as it focuses your attention on the right-of-way and immediate surroundings. This suits my aesthetic preferences but can create problems for elements like buildings. My solution is to carefully select and compose the scene. If I had to include a full signature building or multiple tracks, I would increase the depth of that area but only after considering all other options available.
Presentation
I want to bring all my skills to the craft. I think in images and learn best by watching a process being done. This impacts how I approach any kind of work, whether it’s a design for a cabinet, a room space or a model railroad. The appearance of things matter to me, and for the new cameo I wanted to explore ideas of presentation and composition for a larger scale.
I want a clean distraction free presentation. That means eliminating as much visual clutter around the layout as possible. For example, hanging the module on the wall via a French cleat system eliminates the need for legs.
The basement wall has a slight bow in it, so instead of attaching the hanging rail directly to the wall, I added uprights that I could shim as needed so the rail would be straight. An unplanned but positive side effect was how the uprights created an air space between the module and wall. (See illustration below.) In a basement setting, it’s always good to keep air circulating. I ran the hanging rail the full length of the wall, so I could be flexible in placing the modules. I attached a pair of cleats to the back of each module with glue and screws. The system makes it easy to place or remove things and gives a clean installation.
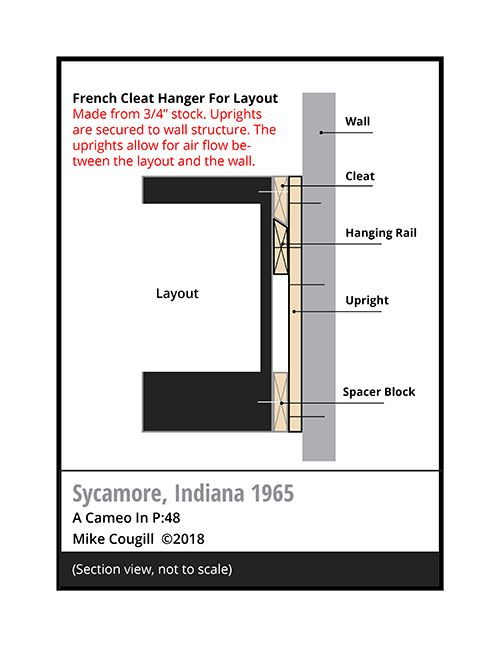
This is the basic idea. Nothing is to scale in this illustration and the parts aren’t nearly as thick as shown. I used up scraps of three quarter inch plywood to make them. Everything is screwed into solid structure and there’s plenty of support for the layout.
The clean simple presentation is very satisfying to me.
In this early image I had one light at the rear and another toward the front. I liked how the light faded toward the ends of the scene but didn’t like the glare in my eyes from the rear light. I thought of adding a baffle to block it but decided to position both fixtures toward the front.
The one comment I’ve received several times is how minimalist the cameo appears. Many modelers use the space below a layout for plastic storage tubs or shelving of some kind. It’s tempting since the space is there anyway. Lots of people hide the clutter with curtains or paneling. I dared to ask, why have such clutter in the first place? Eliminating that mass underneath the layout adds to the clean appearance. There’s simply nothing there to distract the eye and the room feels more open and generous as a result.
Focus On The Modeling
In addition to minimalist design, I want the eye to go directly to the modeling. I painted the cameo exterior a dark charcoal gray that has a dead flat finish. I also painted any interior areas that would be seen from normal view. Again, the dark color doesn’t attract the eye and these surfaces just disappear.
Light The Objects Not The Space
For lighting I used two 46-inch long LED strip lights with a combined output of 3200 lumens. They produce ample light, zero heat and use next to nothing in electricity. I played with the position of the fixtures before settling on their final location. My decision was driven by a desire to put as much light on the front of the scene as possible. It’s conventional yes, but putting a fixture too far back produced an annoying glare, so I shifted them forward and took pains to hide the cord, which exits at the rear corner. I want to see the light, not the fixtures.
For the most part I will turn off the room lights when operating. There is plenty of spillover light from the layout and the darkened space is almost like being in a gallery where each painting or object is individually illuminated. It creates an environment that draws me to the layout and I like the impact of being in the space.
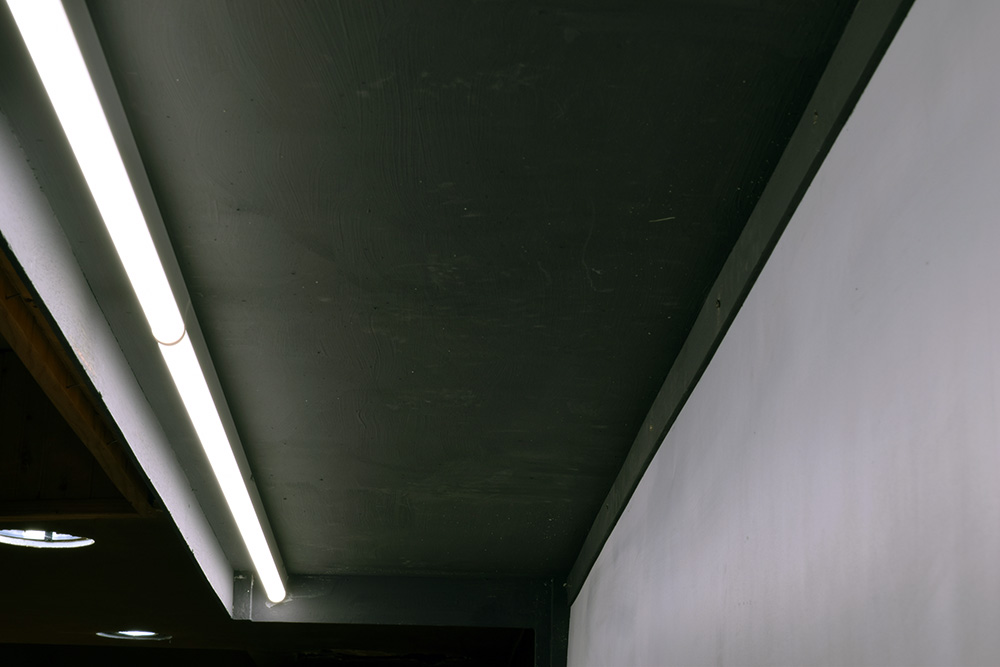
Two LED strip lights get the job done. These are low profile fixtures with simple plug and play connections I found at Menards. I painted the inside of the cameo because my eyes were drawn by the light colored bare plywood. The backdrop is a piece of aluminum flashing stock that was quite thin and wobbly. I secured it with a batten at the top and the foam scenery keeps it in place on the bottom.
The Right Frame
A model railroad doesn’t have to overpower the space it’s in. Like choosing the right frame for a painting, the way we frame our thinking about the craft makes a world of difference in the choices we make; choices that can enhance our experience or take away from it.
Regards,
Mike
Neat.
Cheers.
Mike
Mike,
I read where Lance Mindheim talks about the life span of a layout. So many people go for the “lifetime” layout, which can cause a lot of frustration because interests and skill levels change. I think the British are pretty good at this, build a layout and exhibit it for a couple of years, tear it down to the baseboards and do something else.
I really like your idea here, but would have to worry about the time element going in the other direction, too short. You have already completed most of the work by salvaging the track work from an earlier layout. I would want to work on a layout for at least two years. I would use commercial turnouts in HO and with no buildings could be completed pretty quick. But again, I understand your caveat this approach is not for everyone.
John Moenius
Brilliant idea, Mike, one sadly overlooked too often on this side of the pond.
John ponders the time element, something that I think is a valid point. While I also think an 18-24 month life is reasonable, my thinking is a bit different on this. I’m the kind of person who has 3-5 prototype ideas of interest I’m researching, with each an opportunity to grow my knowledge and skills. The core of Mike’s layout may be complete quickly but by having an operational cameo you both model and operate on this layout while having the opportunity, as this project matures, to work on and plan the next project in an overlapping fashion. It allows interest in both and a chance to develop a rational flow from layout to layout, experience to experience. I see too many medium-to-big layouts frozen in partial construction or near completion with owners not wanting to tear out the work and start the next layout project because of the labor put into the current one.
And then there are people like Ben King had one small layout for most of his adult life and seemed quite content with it for decades. I think the key is to find and do what’s right for you. It won’t work for others, but you’re not doing this for them, right?
This is great, Mike. Beautiful work and I love the way you are going about this.
One thing to be careful about, I’ve found, and with regard to the subject of proper framing, is check that your front valance is framing things correctly. I’ve found that for it to work properly, it has to be deep enough to hide the light fixtures toward the front, but also to hide the top edge of the backdrop from normal viewing distance/height. Perhaps you already have it set up this way, but I thought I would mention it anyway. I am thinking of doing a P:48 layout one day in the future once my current ayout interest has run its course. I may do something similar to what you are doing here.
Best,
Jonathan Jones
The care you have put into designing this is matched only by the care you have put into describing it.
Thank you very much for sharing this.
Another point to add to Dave’s excellent observation is that this kind of cameo design is time less and unspecific. That may sound underwhelming, but in fact gives a lot of flexibility to a design that is basically universal in railroading whatever the era and prototype. It means any modelling project fitting within the basic theme of this cameo layout will find a deserving platform to be displayed and put in action. An old 40ft boxcar or a modern grain hopper will be both at home and the craftmanship put in them will show off quite well.
@Dave: I agree and came to the realization it was foolish to undertake a larger than life project when so many aspect of railroad interest me. Some find solace dedicating themselves to one prototype over decades, other prefer to embrace various aspects and eras. Reducing the scope of projects and framing them better is a good way to both get satisfying results at a realistic pace and explore various aspect of the hobby ones like. There is also a lot of opportunities to develop skills this way and building confidence in oneself.
Wow, there are so many good thoughts here. Thank you everyone! Instead of responding here in the comments, I’m folding these ideas into the next post. Please keep the conversation coming if you want.
Mike
Was just curious, there was a Sycamore, IN on the Clover Leaf Division of NKP. Matthieu makes a great point, and one I have seriously considered. I’ve never been married to one railroad, one era which has caused me problems at times. This kind of layout makes it pretty easy to switch out say 1950 Pennsy to 1990’s shortline. Boxcars for beat up covered hoppers.
John Moenius
Upfront rush and back-end slowdown.
My current project has gone from plywood sheets to a fully-operational railroad in just under a month. That’s a 4’x6′ area, mostly flat, with about 30 feet of track not counting 8 turnouts, HO scale. Still dropping feeders, but running trains already. Next month I will finish detailing and lettering a couple steam engines then finish building a pair of cabeese before building a static grass applicator. With these steps done quickly I can settle into a slower groove of building rolling stock and structures. I expect the railroad to be finished within two years. I’m not super-detailing track but even if I was I wouldn’t expect that to add much time to the project overall. Benchwork, trackwork, wiring and even scenery can all be done quickly; ‘finishing’ rolling stock and building craftsman type structures takes much more time.
Mike
I was thinking of your switching book where you talked about the locomotive being blocks away and out of sight from the switchman. Would a cameo have more operational interest if it featured the other end of the train where the cars are dropped. We all like locomotives, but in this case the locomotive is almost immaterial. I have a Weaver GP38-2 that needs a lot of work, I don’t even know what detail parts are available. But if out is sight, not important.
This blog is thought provoking.
John Moenius
John, that is a very interesting observation. The fact is, as Lance M points out very clearly, the engineer is in control of the engine, but not the moves. The engine gives us motion but what it does, and when, falls on the switchmen. We focus on the engine and the engineer, but its the switchman who really is the object of our interest. That person makes the decisions. Plots out the plan. Calls the moves.
If the engine isn’t seen, as in Mike’s layout, does it matter? You’ve got me thinking on that one. And if it isn’t seen, due to visual impairments (structures blocking view or angle distorting what we see), does it even need to be modeled? I’ve been in situations where cars are moving back and forth but no engine is revealed except though sound. Could it simply be a hand, moving the cars from offstage, perhaps aided in the ruse with sound effects? This shatters most modeler’s idea of a layout but a fully operational layout hand driven would be a unique beast, and quite plausible.