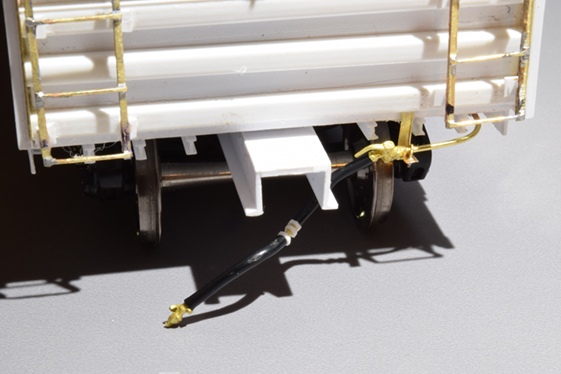
A photo like this hides no secrets. The modeling is laid bare and one can see it with an objective eye. The thing that screams at me is the threads of CA residue clinging to the lower rung of the ladder on the left. It’s funny how I didn’t even see them at the bench.
I know the air hose is at a wonky angle. This car has a cushioned underframe and when the rest of that and the coupler is installed, there is another bracket that will put the hose where it needs to go. That’s the hope anyway. The long hose consists of two Protocraft hollow tubing air hoses with a length of 0.033″ wire inserted in them. The wire helps me shape them as needed and holds that shape when bent. The pipe union in the middle is an exposed section of that wire with three “nuts” made from 0.060″ hexagonal profile strips from Plastruct. I wafered off several pieces and drilled a #66 hole in the best three. I slipped them over the wire and secured with liquid CA. The glad hands and angle cock are also Protocraft castings. For now the hose is a press fit on the angle cock and can be shifted or removed if needed. To mount the angle cocks I drilled a shallow hole on the end and CA’d them to the existing train line. That was fun! (And beginner’s luck.)
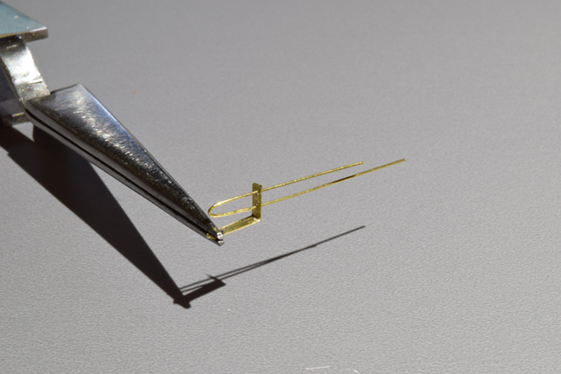
A scale four inch wide strip of 0.005″ brass with a loop of 0.015″ wire.
The support bracket looks impossible but it wasn’t that bad. I hand drilled two holes to pass a length of 0.015″ wire through that mimics a U-bolt. I left the small wire extra long for soldering, then snipped the excess away. I soldered it after the bracket was glued to the car body with gel CA. Such lightweight material only requires a quick touch for the solder to flow nicely. Yes, the U-bolt is crooked but I’m leaving well enough alone.
I don’t mean to sound so cavalier about rendering these things. Truthfully, they were a pain in the anatomy. I had to redo the ladders and make three (or was it four) attempts before I was satisfied with them. As for the bracket and other air line details, I spent an entire work session on them and had to redo things at least twice.
I’m pushing my limits with details like these. They are more delicate and more complicated than anything I’ve ever attempted. The work is rough in spots, too many things are crooked and wonky and there’s too much CA here and there. It’s a beginner’s effort in many ways but this is how one learns and, despite the headaches and do-overs, I’m having a blast with this build.
Regards,
Mike
“I’m pushing my limits with details like these.”
And it shows in the excellent results you’re achieving – good for you! The car is looking incredible. Thanks for sharing your journey through this project with us, Mike… very inspirational!
– Trevor
Thank you Trevor. It’s amazing what you can do when you just make up your mind to try.
Mike
Good point about the CA. A lazy modeller would leave it, on the basis that it would be “enhanced” by weathering. In reality, it will spoil the paint finish, of course.
This is fascinating stuff. Thank you for sharing with us – and please continue!
Simon
Hi Simon,
Yes, it will ruin the quality of the paint, weathering not withstanding. I scraped it off before quitting for the day. Looks much better.
Mike
Keep pushing Mike, makes for great reading 🙂 I really enjoy these intricate challenges
Thank you Alan. I ask everyone to sign their posts even when using your own name. It’s a courtesy to everyone. (Welcome to the club. You’re not the first and this makes you an official member of the blog now!) 😉
Mike
Good morning
I really enjoy following along on this thread. It still really feels just like being there at the workbench.
I like the focus on making each of the components as much as the presentation of a complete sub-assembly. It really reinforces the richness of the detail here.
Thank you for taking the time to share each of these steps with us. I appreciate it.
Chris