I’m thoroughly enjoying Michael Rinaldi’s book, TankArt 3 and have been eager to try the techniques for myself, especially the hairspray paint chipping. This technique has been around for a few years but I’ve just begun my practice pieces and the results so far are promising (below).
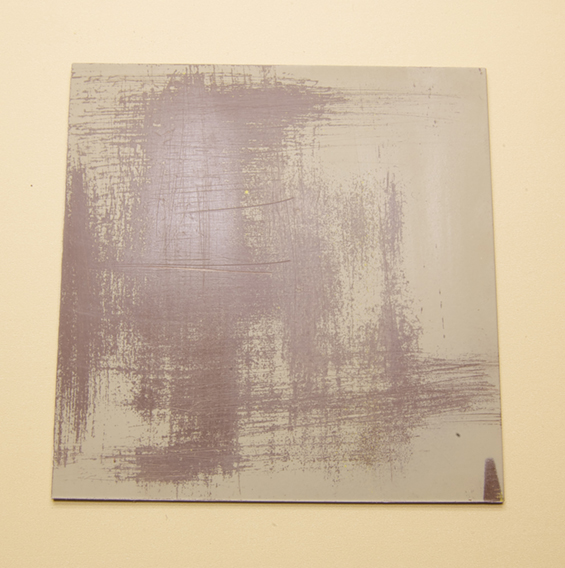
First attempt.
For this practice exercise I simply used a rattle can oxide red primer as the undercoat and let it dry thoroughly. On top of this I sprayed two light coats of hairspray (TRESemme’ Ultra fine mist) and let each dry to the touch. You could also use a hair dryer on low heat to speed the drying time if you’re impatient. Just don’t get the dryer too close to the plastic and be certain to keep the heat moving about to prevent melting anything.
Once the hairspray coats are dry (they only take a few minutes each), you can spray your top coat. I used another spray can enamel (the camo green) simply because I didn’t want to fuss with setting up and cleaning my airbrush to do three seconds worth of spraying. Although in time, I will have to practice with the airbrush.
It’s recommended you let the top coat dry for about twenty minutes or so before chipping it with a stiff bristle brush and water. Since I used enamel for both paint layers, I wondered if the water would work. It did, and quite nicely too. Although I suspect that letting an enamel coat dry thoroughly would not work.
With this technique the hairspray prevents the two paint layers from bonding and as the hairspray dissolves via the water and scrubbing action, the top coat of paint will chip away in a realistic manner, revealing the undercoat. I achieved passible results right away but more practice is in order.
Feeling enthused from the success of my initial effort, I tried a two color top coat, separating the colors with an additional coats of hairspray. I also had reasonable success although I’m not happy with the orange color. This was another spray can enamel and it is far too thick for proper scale effects on a finished model. Because of the additional thickness, I also tried chipping the orange with a scrubbing pad instead of a stiff brush to see what would happen. I got too aggressive with the abrasive pad and put numerous scratches in the surface, which is not acceptable. In fact, you’ll notice some scratches in the first photo where I scrubbed too hard with the stiff paint brush and the metal ferrule scratched the plastic. This could be a result of using enamel paints, not enough hairspray or simply being too aggressive with the tools.
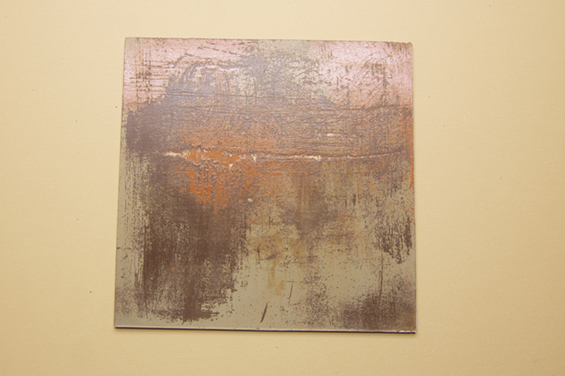
Second attempt. A partial success.
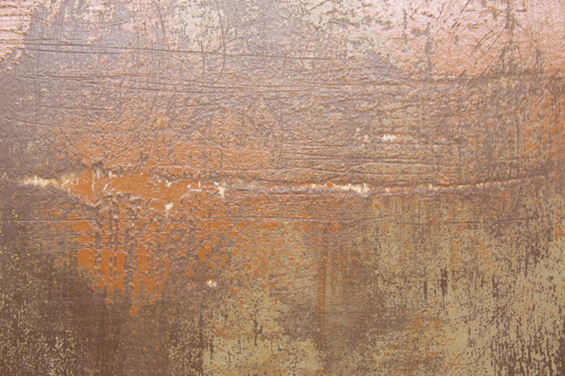
Close up of the two coat test. The overly thick orange paint and scratches won’t do.
It was a good session and taught me a lot. The technique is easy to use but one does need to exercise restraint with the effect. The things that can go wrong include too much or too little hairspray and poor painting techniques. Using the wrong solvent or type of paint will also produce a mess. My experiment with mineral spirits cut through all the paint layers down to the bare plastic. Not what I wanted to see and this is why I practice such things.
The technique holds a lot of promise for our purposes and if this were an actual project I would work from photos of weathering patterns on a prototype car. Even then I would practice beforehand with the materials and tools I planned to use to build confidence.
Now I have an incentive to get something off the bench and ready to weather. But I still have practice to do with the airbrush and actual model paints before that happens. Patience will be a virtue that pays dividends here.
Regards,
Mike
Although you describe the second attempt as only a partial success, and feel that the thick orange paint and scratches “won’t do”, I think it would be a mistake to dismiss the effect you have created out of hand. It may not be what you were trying for at that time, but there is definite potential there for showing the damage caused by intense industrial use, for example in a quarry. The depth of the scratch, and the brightness of the orange, suggest that something which has already been battered a bit has recently received a side swipe from a front-loader, or similar, possible in an ironstone quarry, of which there used to be plenty near me.
Simon
Hi Simon,
I agree that in the right context and scale, such effects could be plausible. However, for quarter-inch they are out of scale and certainly so for anything smaller.
Also, I’m not that big a fan of the rust bucket school of weathering. Yes, extreme examples of weathered rolling stock exist but I prefer a more restrained approach given what I see locally. This technique has a place in our toolboxes but needs to be used appropriately.
Regards,
Mike
I do like your first attempt. One thing I would recommend is paying a lot of attention to the background (rust) as well. You can also follow up with highlights on your chipped areas which will add more depth to the chipping paint however, I would agree with Simon, the scratches on the surface material might be a little deep. I like to add washes to the area when done to help blend the area together (I sound like Bob Ross, sorry).
I personally really like this and the salt technique. Both work well for all types of material including wood. I wrote about it here, http://shortlinemodelers.com/paint-shop/weathering/chipping-paint-wooden-models
Keep up the good work!
Shawn
Hi Mike,
I can’t comment on how suitable it might be for 0, without first asking a question:
How big is that test piece?
Like you, I prefer restraint, but there are occasional uses for a more heavy-handed approach. In smaller scales texture needs to be low key, and I think paint can do a lot to help. Always a difficult one: scaled down, some textures disappear, but the human brain expects the eye to find some relief.
Simon
Thanks Shawn. Yes, lots more to learn before I sleep. 🙂
Mike
Simon,
It’s four inches square.
Mike
Thanks. I see what you mean.
Simon
Hi Mike;
Well, you certainly captured the look of damaged metal! I agree that the results in your tests wouldn’t translate to models in 1/4″ scale or below.
From what I read in skimming the reviews of the TankArt books (thanks for bringing them to my attention!) and some other sources on the web, I think two possible issues are too heavy a top coat of paint, and working too hard with the brush. A thinner top paint coat (easier with the airbrush) and less force behind the chipping brush should yield more scale results. If you are bending the bristles so much the ferrule is scraping the subject, I’d say that’s too hard. Good way to simulate door scrapes or side-swipe damage though!
The other issue to consider is observing the prototype to determine where this technique is applicable. Tanks and rail equipment face different types of usage(crews climb all over the vehicle, stow equipment on the outside, drive through brush and low-hanging trees), and are painted in very different ways (flat paint for concealment on the tank, and no need to worry about about it lasting more than a couple of years before repainting or the destruction of the vehicle in wartime; gloss paint designed for long life on the railroad equipment). It is easy to “like” an effect and end up using it in places which are not realistic. I can see this technique around doors, hand holds and roof hatches or the edges of open topped cars, but I wouldn’t use it on the side of a boxcar or covered hopper without a photo to show it is the right effect to use in that place.
Pieter
Welcome to the blog Pieter.
I agree with your assessment about the technique, the results shown and the differences in how trains vs. tanks weather. The samples in the post are nothing more than practice exercises, without any expectations beyond learning what works.
Regards,
Mike