I have an epic tendency to overbuild things. The Indiana & Whitewater will not go gently into the night whenever I finally decide to dismantle it. For this project however, I’m determined to go light on the construction without sacrificing strength.
There have been lots of lightweight construction systems documented here and abroad and I’m drawn to aspects of one used by Gordon Gravett of Great Britain for his latest exhibition layout Arun Quay.
As described in the Model Railway Journal No. 235, for his baseboards, Gordon created a lightweight sandwich of 1/16″ plywood wrapped around a 50mm thick by 75mm tall styrofoam core making the equivalent of a 2×3 that has only a fraction of the weight of solid lumber.
The foam serves two purposes: it provides support and a generous glue surface. Trying to edge glue thin material into a hollow box and keep it square would be an exercise in madness that I can do without.
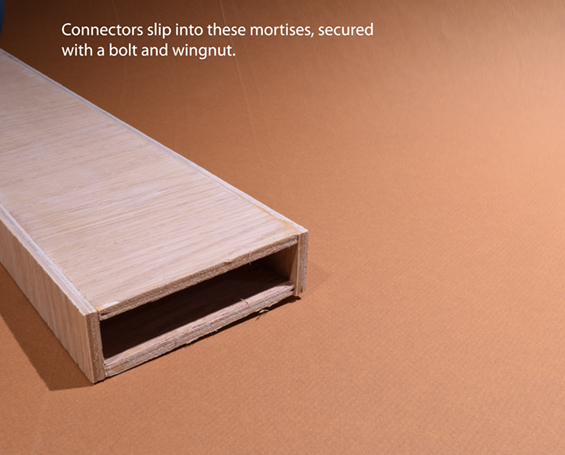
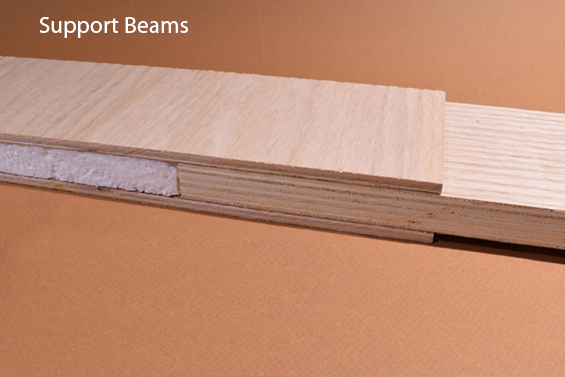
I decided to use this technique and to also follow Gordon’s idea of a separate support structure that can be leveled prior to placing the display module. Since I want to keep all components to a maximum length of four feet if possible, I made three beams, each four feet long that are supported by lightweight legs. To align and connect each beam I added 3/4″ plywood blocks for a tenon that fits in a mortise on the adjoining beam.
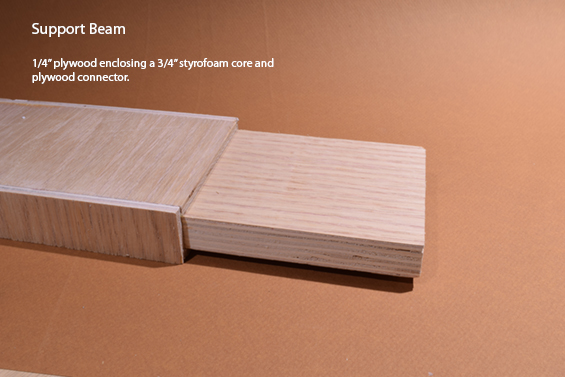
For my project I used 1/4″ plywood as it is readily available. For the core, I used strips of 3/4″ foam board cut from panels designed to fit stud cavities and joist bays. These expanded polystyrene panels were much less expensive than the extruded foam and I used it for the scenery support on the I&W with no problems. The photos show how simple the beams are and the materials are easily cut with a tablesaw. They do however, take time and effort to glue up and Gordon suggested using one of the many brands of foam compatible tube adhesive but in playing around with a mock up, I found ordinary carpenter’s glue worked quite well, it just needs a longer clamp time. I won’t go into a ton of specifics here, as you can figure things out from the photos. At 3-3/4″ high, these are more than adequate for the loads they’ll bear and are very lightweight. The 3/4″ blocks are probably overkill but they provide a lot of glue surface and solid attachment at this stress point.
Foaming over foam
There is a lot of debate about the kind of foam board used in modeling. Most recommend using the denser extruded foam in place of the expanded polystyrene or beaded type. I’ve used both and personally, I don’t see that much difference. They both make a horrendous mess when cut and shaped and, for this application the foam is just filling a void, so I don’t see the need for the more expensive product. We all have our pet materials and processes, so it’s your call.
I want the display fairly high for better viewing and plan to build some lightweight leg assemblies to fit the beams onto. The display modules will then sit on top with a simple alignment system to secure them and I’ll have a dark colored fabric skirting below for a finished appearance. This presentation style has been thoroughly proven on the UK exhibition circuit and there’s no need to re-invent the wheel.
The display module consists of a three-sided quarter-inch plywood box surrounding the modeled scene. At 16″ w x 48″ long, the size is modest, so the quarter-inch material is sufficient for the task. One deviation from common practice will be enclosing the top completely. With a taller height for viewing, there will be little need for the typical helicopter perspective and an enclosed top also provides a built-in lighting platform. I’m very eager to experiment with directional lighting and with LED lights, heat build up will not be an issue.
For the track support, I have used 1/2″ fiberboard material on every layout I’ve built over the last twenty years. However doing so here, even with such a small area to cover, will add a lot of needless weight. I think I’ll restrict the use of the fiberboard to the track since I’ll be handlaying it and use 1/2 foam elsewhere. The primary module has a lot of pavement area so I’ll have to see how things shape up before making final decisions on materials. Next time, I should have some photos and a shakedown on the actual construction.
Regards,
Mike
What a terrific concept, Mike – thanks for sharing it here. I subscribe to MRJ and I have to admit I glossed over this article because I’m not in baseboard/benchwork construction mode. But I’ll have to remember it the next time I am.
I can think of three considerations for the choice of foam:
1 – weight of the product. Is there a difference in weight between the extruded and the expanded?
2 – thickness of the product. If the foam used is the same thickness as the plywood blocks used as connectors, then it’s easier to build this type of structure. I know extruded foam comes in various thicknesses and many of them are matched to common lumber/sheet good sizes (e.g.: 1/2″, 1″ and so on). I’ve never shopped for extruded foam so I don’t know what thicknesses it comes in.
3 – availability. I know extruded is available at home improvement stores – I’ve never seen the expanded there (but I wasn’t looking for it). This is less of a concern, really, since one would likely be buying enough for the entire project in a single trip.
Again, great post and I’m really enjoying this project. Thanks for sharing it with readers!
– Trevor (Port Rowan in 1:64)
Hi Trevor,
There are differences between expanded and extruded foam products. The extruded is slightly denser and therefore stronger for a given thickness. The difference in weight is a non issue. Extruded foam tends to produce a finer dust particle when shaped with a rasp that I’m confident is not healthy to breathe. The extruded does come in a wide range of thickness up to two inches if I recall. Both are available in 4×8 foot sheets.
The precut strips I’m using come shrink wrapped in packages of six measuring 13-1/2 inches wide by four feet long, designed to fit studs 16″ on center. The cost was between five and ten dollars versus almost thirty for a sheet of extruded. I found the strips in the aisle with rolls of fiberglass batts at my Lowes store.
In this project, the quarter-inch plywood carries the structural loads. The foam is really just filler and made gluing the pieces easier.
Mike
Nice work, Mike. The foam is a little bit more than “just filler”, though. Although the plywood is carrying the load, the foam keeps the components of the beam stable, without the need for extra bracing. It is a neat use of the differing properties of the materials, and a great engineering solution for lightweight beams – all the rigidity of a solid piece of wood, with a fraction of the mass. As you say, the exact form of the filler is not the main issue: it just needs to be light and stable.
Already looking forward to next Wednesday…
Simon
Hi Simon,
Yes quite right Simon. As for being a great solution for lightweight beams, full credit belongs to Gordon Gravett, it’s his design after all.
Mike
I liked this style of beam construction, but until Simon pointed it out, I couldn’t figure out the advantage of the foam core. Thanks.
I wonder if, in the name of mass producing these: could you laminate a larger sheet (the three layers) and once the glue has set then rip them down into smaller strips on the table saw? Once cut smaller, then just glue on the missing sides?
Just a thought.
Cheers
/chris
After I’ve built them, NOW you come up with such a great idea!
Mike
Oops. I can only apologize, Mike.
I doubted my own ability to line up the narrower strips more than once.
Cheers
/chris
Not to worry Chris, it’s a terrific idea if you have a large flat area to build the panels on and weight them down until the glue dries.
I didn’t have any problems keeping the pieces aligned. After applying a generous amount of glue, I rubbed the pieces back and forth to spread it. This created a suction effect that held things in place long enough for me to use a small square to align the edges on two sides, making the three piece sandwich even. If needed, a bit of polish with a sander trued things up nicely. I only put enough clamping force to hold everything because the foam layer was easily crushed.
Mike