In response to a question about the underpinnings of the module and how it sits on the frame work, I’ve included a couple of photos of these areas. They are, I hope, self-explainatory.
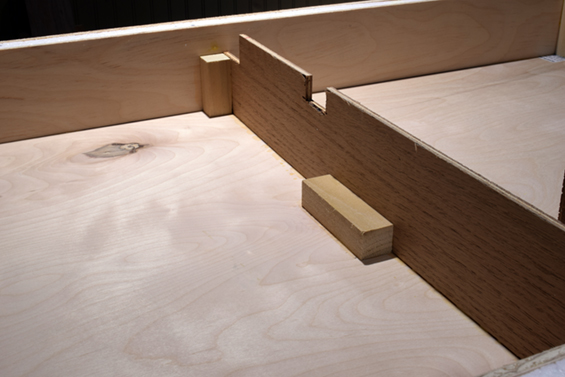
The underside of the modules are nothing new to British readers. This type of lightweight construction is well known and widely used in the UK and other parts of the world. The notch close to the outer member allows the future drop cloth that will cover the legs to be hung as a continuous piece of fabric. The middle notch is a failed attempt at aligning the module to the support structure. It serves no purpose other than to remind me to pay closer attention to whatever I’m doing.

As seen here it was far simpler to align the module where I wanted it and then glue a set of guide blocks to the center beam to hold it in position. This worked well and doesn’t add any appreciable weight.
I’ve now reached the point of the project where things become less interesting from a narrative point of view. The next steps would be all the how-to stuff about laying the track and doing the structures, using techniques we could all recite in our sleep. Therefore, I’m not going to spend time covering them here because I have nothing new to add in terms of materials or processes. So rather than waste everyone’s time repeating the obvious, I’m going to move on to other subjects and return to this project when the situation warrants further coverage.
Regards,
Mike
Might I propose that you just post some pictures then if you don’t wish to invest in a full narrative? We readers at the other end of the ‘net would appreciate at least seeing things progress and come together, even if there were no words or the only words were “See chapter 5 in my book, Detailing Track”. 🙂
Don’t worry Rich, I plan to keep people informed. The readers here are accomplished modelers and my view is that covering basic material like: “spike one rail in place, then using your track gauge to space the other…” is not productive. I’d rather respect everyone’s time for coming here by offering material that you won’t find elsewhere.
Mike
Thanks for the detail photos. The module really would fit together easily and nicely.
As for the updates, I understand your thoughts regarding updates. We probably don’t need to know that when you ballast your track you wet it down first and to do so, you don’t just use plain old tap water but make sure to add just a drop or two of dish soap to the water to help with surface tension. Sometimes it’s not that I expect to learn something new from an update as it’s just nice to read someone else enjoying doing something that I enjoy too – that sense of community. Further, does it really hurt to show a little behind the scenes of how a really beautifully constructed P48 layout comes together?
It’s not so much educational as it neat to see how you like to go about these tasks.
Cheers
/chris
Okay gang, here is an opportunity.
Many of us are tired of the shopping list, technique driven layout article format. As in: “My structures are from Walthers, Design Preservation and other kits and my track is all Atlas Code 83 laid on N scale cork roadbed on top of L girder and plywood. I made my scenery from Woodland Scenics everything and blah, blah, blah on it goes.
We’ve seen it, done it and can recite the shopping list in our sleep. Here’s the deal, what would you like to know in such an article that the writer never tells you? Beyond the here’s what I did and used format, what would interest you as a reader the most? Consider this an official OST, let’s change the paradigm survey. Nuff said. The ball’s in your court now. Do something with it.
Mike
Mike,
I really enjoyed reading your process and mistakes with your P:48 boxcar build. It was refreshing to hear/read someone share the mistakes and the lessons learned. Modeling is a process of growing, and sharing just the successes isn’t sharing the whole story. So I would like to hear more about the trials/problems your encountering as you build this diorama. I’m currently in the process of trying to rebuild a 1/29 layout outdoors, with the possibility of making it P:29 (something that doesn’t exist yet in large scale), so reading about your trials in P:48 is an encouragement for me to keep trying to push the boundaries of my modeling (and even trying to share it with the world).
Another issue that would be interesting to write about is the time commitment/scheduling that allows you to model. Everyone seems to have an excuse as to why they aren’t modeling, but the successful modelers make time. Explaining how you make sure you spend time modeling each week/day/month, or goals that you set for yourself would be an interesting read. Every Wednesday, you make a post here, so I would imagine that you have developed some sort of routine even for something as simple as making a blog post (something that isn’t quite as simple as it seems).
Those are my thoughts, and would be encouragement/motivation for me with my modeling.
Craig
Hi Craig,
Those are good points and really helpful for my understanding of what you guys want to know. I’ll address my modeling and writing routines in the Wed. post. I don’t experience any greater issues with P48 than one working in coarse standards. People want to make fine scale standards into some kind of black art that only a few can master. That simply hasn’t been my experience with P87 or P48 and my skills are really ordinary.
Mike