
Prototype door lift ring? Greg Elem Photo, used with permission.
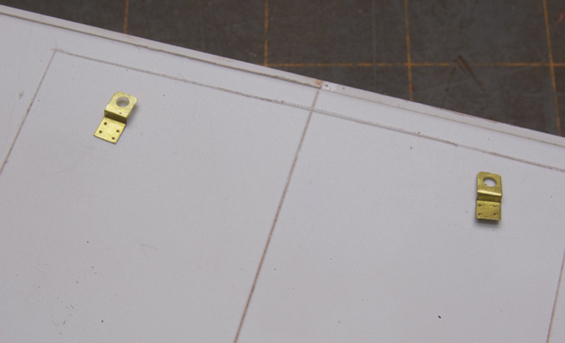
My version in quarter-inch scale from 0.005″ brass
It should be simple. Take strip stock, drill a centered hole, then round off the corners on that end. Make two opposing bends to create an offset, make four rivet impressions and then trim to length for a mounting tab. Simple.
Only the first twenty-four were hard.
The Chatter Going Through My Head (HC):
Hmm, what size are these things? No idea. How long is that lower portion with the rivets? Looks to be…
What’s possible? It’s a question I hadn’t considered about my modeling until I read a thoughtful post from Cal Newport about an unlikely Nobel Prize winner and his journey as a scientist. At the end of the post Cal suggests we often settle for the convention of what we already know how to do rather than ask ourself what’s possible and doing what it takes to accomplish that.
HC:
Metal or styrene? Metal would hold up better and making these in one piece is better too. What do I have in stock? Nothing. I’ll have to make my own strips from sheet. Let’s see, 0.010″ brass. Umm, too thick. Don’t have any 0.005″. Here’s some 0.008″ tin. It’ll do.
I can work styrene till the cows come home. Nothing to it. Metal is different. Metal is not only harder to cut accurately, it’s harder to true up an edge; harder to mark and requires different tools that I don’t have. It requires a different mindset than styrene.
HC:
I should be able to drill that hole by hand. It’s just one stupid hole in each piece. How hard can it be? Is that centered? I can’t tell… Damn. Guess I’ll have to make a jig and use the drill press. Okay, let’s see what I’ve already got here. Nope, nope, wait, I can make this old jig work. Great, now I have to cut another strip. (#$%@!)
It’s easy to plunge ahead based on what you already know. when it comes to doing things differently, succumbing to such a mentality, makes things harder than necessary. Everybody thinks that years of experience magically falls into place just because you sat down to try something, or that having a shop full of tools makes them a craftsman. That’s BS. A fancy table saw won’t turn you into Norm Abrams overnight. It starts with your attitude and a willingness to make lots of mistakes. Craftsmanship is in the mind as much as the hands and tools. Having proper tools certainly helps and I don’t have proper metal working tools. You improvise and make do or invest in the right tools.
HC:
Okay, this should work. Damn it’s hard to see. Is the bit centered? I can’t really tell. This jig is so cramped and that shadow is in the way. I need more light at this bench. Duh, maybe if I actually put the OptiVisor on? Well it looks okay. Let’s see. Nope still off. Adjust the table a bit, Snip that end off. Well, closer, I guess it’ll do. I can fix it when I round the corners.
Gene Deimling wrote on his blog that the aging process is not kind to modelmaking. It’s true. The quantity of light that worked for me in years past is not adequate now. Same with the level of magnification for my eyes. I want more of both because my vision has changed in unexpected ways. Seeing close-up was never a problem in the past but now it is. It’s a fact of life. You acknowledge it, adjust what you can and move on. As for fixing the hole being slightly off by filing? See the preceding paragraph about making things harder than needs be.
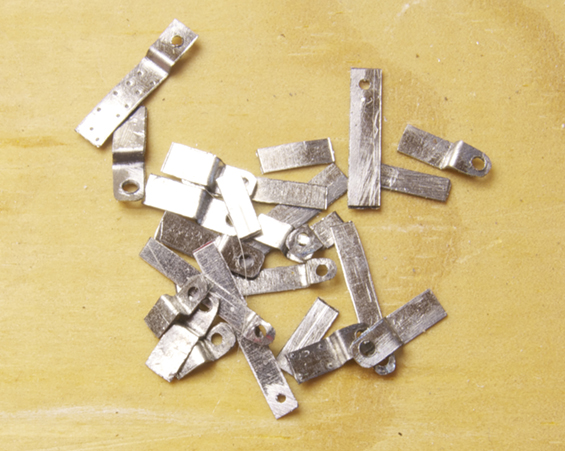
Reject pile
So far, I’ve made 28 (and counting) of these pieces and discarded 24. This is the process to get four that were acceptable and, it’s the price paid to develop a new skill. Yes, I’m aware that laser cutting or etching would simplify things. However, this project only needs four of these details and the time spent at the computer learning to create the drawing for an etch is better spent at the bench actually making the parts.
Making this detail is an exercise in studying my reference photos, analyzing what’s happening as I work and comparing the two. I’m not only learning to observe carefully but also teaching myself how to do what it takes, rather than settle for the easy road of convention. In the process of learning how to work with metal, I grew dissatisfied with the tin and so purchased some 0.005″ brass sheet and took the time to make a proper drilling jig with better visibility and alignment capabilities.
In a culture that worships easy, no-effort required solutions for everything, such pains are scoffed at relentlessly. However, in doing all this I’m building a skill-set that will free me from a fickle marketplace of products that come and go on a whim in this scale. I’m laying a foundation of greater capacity and freedom to model as I choose. Mostly, I’m doing it for the satisfaction derived from meeting such a challenge and from holding myself accountable to a freely chosen set of quality standards. At nearly sixty years old, I’m learning how to learn and finally have an understanding that the satisfaction comes from learning to love the process itself.
Cal Newport, Study Hacks Blog
Doing What It Takes Versus Taking What You Already Know How To Do
Cheers,
Mike
Whilst I appreciate that new materials come with new problems, such a simple item really shouldn’t give you so many problems. In either tin or brass, all you need to make a centred hole is to bash whatever you use to impress rivets into the back more forcibly to make a good sized hump, then file the hump off with a smooth Swiss file. A hole will appear which you can then twiddle out with a nice sharp rat’s tail file moving it around till it’s central. I would recommend nickel silver over brass. It’s harder and crisper to work and takes paint so much better. I am the world’s worst driller of holes, so this has become my default method of making orifices in anything. Made easier still if you have a set of broaches, silver smiths’ 5 sided tapered reamers in a graduated set.
As I know you to be as fussy as me, might I suggest you more convincingly suggest those bolt heads by pushing a piece of tube over the impressions from the front, then filing the heads flat. The tube sharpens the form and the filing makes it look more like a bolt head.
Hi Mike,
All I can say it good for you! Not only did you venture into a less familiar medium, you stuck with it even when I’m sure it got frustrating. Yes it took 28 attempts to get 4 good ones, but next time there’s a similar part to be made, I’m betting it won’t take that many.
The biggest problem for me in situations like this is the temptation to accept a part that isn’t quite up to my standards feeling that it is “good enough” or that I can fix it when often it would be easier to just scrap it and remake it. Part of my learning curve is finding when to just bite the bullet and remake the part.
Hang in there,
Bill Allen
Des Moines, IA
Hi Martin,
Not problems per se, just the normal experience of learning the properties of a different material. The new drilling jig works wonderfully and now that I have the procedure down, making these is straightforward.
Appreciate the tip about the bolt heads.
Cheers,
Mike
Hi Bill,
You hit on the greatest source of frustration: the conflict of doing something properly versus the desire to settle for good enough.
Making the number of attempts I did was just part of the working process that I committed to. Not frustrating at all when you’re clear about your intention.
Good to hear from you.
Cheers,
Mike
Maybe the problem really is when modellers use “good enough” when they are really settling for “not good enough”?
Simon
I don’t know Simon. I think it depends on your mindset and what you let yourself be influenced by. For this project I made an initial decision that will guide me throughout as to the quality of the work. Many people simply make such choices over and over as they go. Is one way better than the other? Perhaps. But it is left to the person to decide that.
I’m tap dancing on the edge of a deep hole now, so I will leave it at that and move on.
Cheers,
Mike
This is a difficult issue: personally, I am struggling to find the right words, but in essence when it comes to the level of detail applied to individual models, and the amount of work which naturally follows, there is an interplay between more (models) of less (detail), and more (detail) applied to fewer (models). Where we each sit depends on individual circumstances, resources and aims, etc. Not always the easiest of balancing acts, but once settled, I suspect that the “mojo” is found and kept alive!
“Good enough”, as originally espoused was about the right level of effort to achieve that balance – in the context of a basement empire focused on replicating operations, a moulded detail may be better left alone rather than removed and replaced with a casting or etching.
“Good enough” is not about sloppy/poor/substandard workmanship, which I think is the interpretation used by some as an excuse for not really trying. I really don’t mind someone not trying, to be honest: I do mind them being dishonest with themselves, as that way unhappiness lies. Through work I once met a very happy modeller who used Peco flex track and ran RTR trains. But he took care when laying the track (he used foam underlay, Tracksetta templates for curves, and made sure there were no kinks and doglegs). His interest was in operation, but as he said, the last thing he wanted was trains falling off the rails all the time, as it would destroy the realism. He also took care to maintain his stock, so that it ran well. To me, that is a perfectly valid interpretation of “good enough” as he knew what he wanted, and did it as well as he could.
I agree about tap dancing – the real worry is falling off and going down the drain! *
Simon
* That’s (nearly) a UK joke, as we use the word “tap” for a faucet.
PS Meant to add, that’s a nice bit of modelling and a good advertisement for having a go.
Simon
Mike, what have you done?
Deliberate practice.
Just because the items are not to the standard you have set, you have practiced 28 times to improve your skill set. I know it’s only a small item, but consider the benefits.
Now you have learnt (practiced) to use different materials, punch holes and make rivets, bend and shape them etc. Also you have have been judging the quality and suitability of the process and results. All this adds up making you a better modeller. Once you achieve the standard you require, continue to make a few more, just incase you need some in the future. Remebering that all skill sets are “perishable” to some degree.
Another benefit to your “unacceptable” attempts is they offer unlimited opportunity as detailing items. For example they could be used to create a small pile of rusty parts or a box full of discarded parts as detail scenery. Another opportunity would be to use some of tose discarded parts and see the effect of dipping them into etching solution, or salty water and see the natural effects that result, just to add another technique to your modeling arsenal. Your creativity (imagination) is the only limitation.
Not all is lost from this deliberate practice…
Marz
Deliberate practice.
Exactly Marz. Thanks for your observations.
Cheers,
Mike