Over the years, I’ve begun thinking “railroad” over “trackplan” whenever I’m designing any aspect of a layout. When researching the branchline that inspired the I&W, I obtained permission to explore the yard at Brookville. This gave me the chance to actually measure the turnouts used there. The bulk of them were No. 10s and knowing this made my planning process easier.
The I&W also uses No. 10 turnouts and, in quarter-inch scale no less, which defies every design admonition written over the last forty years. Here are a few thoughts on using long turnouts in small spaces.
1. Use them where they are needed the most.
For most of us space really is an issue. The prototype doesn’t use the same number turnout everywhere and I’m not advocating that either. Using long turnouts indiscriminately is a certain pathway to frustration. Follow the example of the prototype and use them where they are needed the most. Examples include situations where long equipment is routinely routed or where track speeds need to be maintained as much as possible.
When deciding what number is best in a situation, the thing to consider is what has to happen here? If you’re modeling an auto plant or area where 89 foot long tri-levels or container flats are handled, this isn’t the place to use a bunch of No. 4 or 5 turnouts, no matter how much space they supposedly save. The equipment will look ridiculous and operation is likely to suffer.
Mainline passing sidings are a logical place to bump up the numbers as much as practical. My runaround has No. 10s on both ends. Yes it is a short runaround, but then it’s also a switching layout with appropriate length trains.
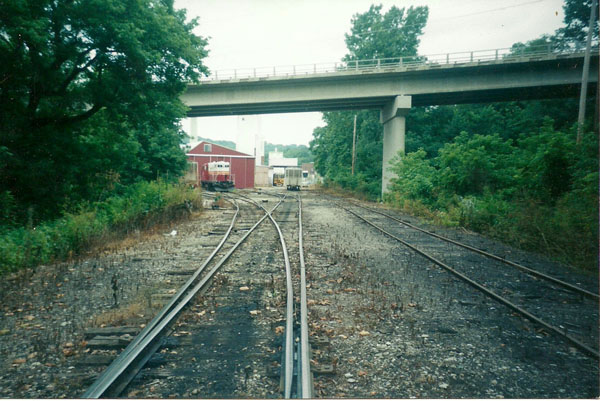
No. 10 turnout on the I&W
2. Nest groups of turnouts together
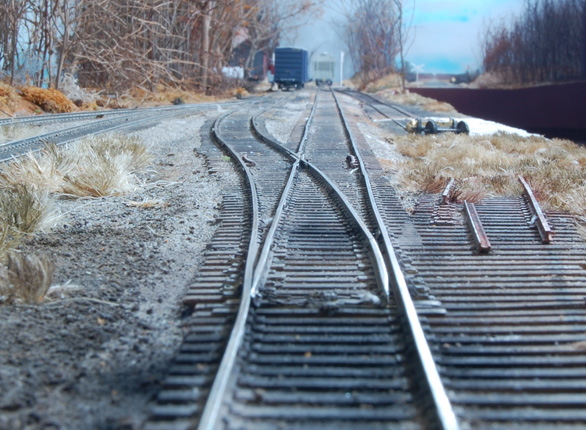
As seen in the photos below of the trackage around Mill St., I grouped five turnouts into a compact space by nesting them together. There are four No. 10s and a rogue No. 7. I say rogue because I wish I had used a No. 8 instead. This No. 7 is the shortest turnout on the layout and I think it sticks out too much as a result. Live and learn.
Although you can’t see all of it in the first photo, the No. 10 crossover is four feet long from one switchpoint to the opposite switchpoint. You can see how I tucked in the turnout leading to the Pole Track and the short one to the Mill Track. The Junction Switch is out of the photo at the bottom.
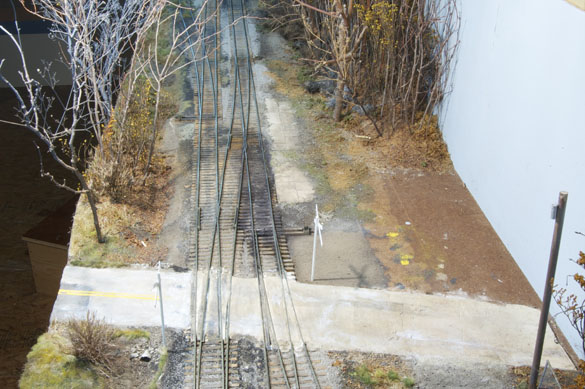
Here’s a better view from the opposite direction.

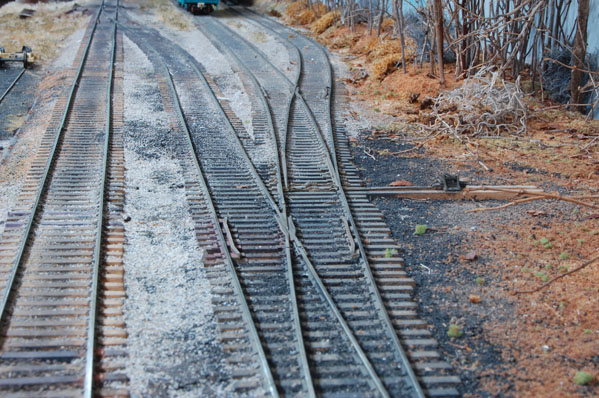
Near the yard, I tightened up the spacing of these two No. 8s by bringing the points of the second one as close to the frog as possible. This was simple with hand laid trackage. You can do this with commercial turnouts but that entails a lot of cutting and fitting. In addition, the ties just won’t look right, unless you strip them off in the affected areas and substitute longer ties to span both tracks. In a situation like this, it’s actually easier to hand lay the trackage.
3. Don’t be afraid to break with convention
I deliberately chose No. 10 turnouts for a 24-foot long, 1:48 scale switching layout, with the full knowledge that certain tracks would suffer in terms of capacity. My runaround is only eight feet long, which is pretty short in this scale. It works because my staging track is also very short as is the yard trackage. Put simply, all of the various tracks are balanced in terms of car capacity, so I don’t need a long runaround track. Following the conventional wisdom that says I would gain a car length or two by using No. 6 turnouts on both ends would have conflicted with my primary objective of modeling the track as faithfully as possible. Following my objectives over convention was an easy choice.
Which one would you have chosen?
Regards,
Mike
Mike, many great points to think about on this one, especially when you say to think railroad instead of track plan! After reading this article I went back to look at and think about my design, needless to say I believe I went track plan first. All of my proposed turnouts are #5 industrial type. I did this for a couple of reasons…first I have a fastracks #5 t/o jig, which I spent a lot of money on and plan to use it as much as possible. Second I know that my equipment will easily traverse a #5 (it all ran fine on crude 3 rail #4s). And lastly, I decided to compensate (bad, I know) t/o length for siding/spur length.
While, my RR is designed with these compromises I will try to correct them as much as I can during the build. A #5 t/o, while not devastating to the overall operations and appearance of the line will eventually bug me to the point that it will have to be changed. Its not the fact that it works but the fact that in the back of my mind I know that it is not right. Industry standards fluctuate from company to company but I know that a #5 is not acceptable. Minimum t/o for BNSF industrial trackage is a #9 with a #11 preferred. CSX is a little more lenient only requiring a #8 but a #10 is, of course, recommended.
The line between an industry intense layout and a prototypically correct layout is one that I am often coming to. I am still trying to figure out how to have both. It is hard to look at a prototype and realize that it is miles and miles long or that and industry covers acres of land. Of course I cant fit all of that into a Model RR but deciding what and where to put the important parts is my battle.
Hi Will,
You bring up a lot of great points that people must think about in their design work. The choice of turnout size versus siding capacity, or the number of tracks is a tough call to make in any situation. I went through numerous rounds of back and forth decisions, measuring this and that, and tons of visualizing with full size mock-ups before settling on the track arrangement I finally built.
It’s a decision that each person has to make for themselves, something I should have emphasized more in the post than I did. I can understand the desire to fully utilize an expensive jig like the FT, however, if you already suspect that the appearance of No. 5s will bother you, do yourself a favor and rethink it now, instead of rebuilding everything later. It sounds like that’s where you’re at. Remember though, that standards are often waived by a special circumstance, such as the need to get a track in a given location for an important customer. The PRR in Richmond once had some ridiculously tight industrial trackage to serve various customers.
If I recall your plan, using longer turnouts will simplify things considerably in the amount of space you have to work with. This isn’t all bad. Operations can be much more involved than modelers realize, when we do it like the prototype has to. We have a railroad professional or two among the readership as well as modelers who are experimenting with replicating the procedures used by prototype switchmen and I hope they will share some of their wisdom on how things are done in the real world vs. the typical model op routines.
What I’m getting to is the thought that a simplified layout design doesn’t have to mean simplistic-over-in-three-minutes operations. Later this year, TMC 05 will cover the switching moves I’ve observed locally. There’s a lot more to it than meets the eye.
“It is hard to look at a prototype and realize that it is miles and miles long or that and industry covers acres of land. Of course I cant fit all of that into a Model RR but deciding what and where to put the important parts is my battle.”
This is the crux of it for all of us. I understand how frustrating this can be and anyone who has built a layout has wrestled through it. The only advice I can offer is you have to decide what is the most important to you and let the rest follow or go away. None of us has room for it all. For example, what does “industry intense” mean to you? Do you see lots of different industries or see intense switching, or something else altogether? There’s more than one definition to the phrase. Understanding which is most important to you will impact the rest of the decisions before you.
Regards,
Mike
Mike,
Great article, great photos and great modeling. I’ve been using longer and longer turnouts for my modules and my new layout. I originally designed my prototype Industrial Lead layout to use #6 turnouts, but they just didn’t look right. I went out and measured the frogs on my prototype and found them to predominantly be #14 and #10 frogs, the final frog on the prototype Industrial Lead is a #7. I’ve decided to model them all as #10 turnouts and bought a Proto:87 Switch Works jig to do so. I’ll be sacrificing a couple of car spots, but the long turnouts look so graceful, how could I resist 🙂
Greg Amer
The Industrial Lead
gregamer.com
facebook.com/TheIndustrialLead
Hi Greg,
Appreciate the comments and I’m glad you’re here. Maybe if enough of us keep up the emphasis on modeling track faithfully, we can help more people to see the limitations that short turnouts impose. I like your plan! It looks like there’s plenty of operation to keep one busy, without it being overwhelming. I also wish that all the great P87 products out now were available when I was working with it ten years ago.
Regards,
Mike