My first encounter with a genuine steam engine was a Norfolk and Western 4-6-2 at an Ohio railroad museum when I was a teenager. It was the first time I understood what old-timers meant when they said a steam engine has life. The sound of the pumps and exhaust, even at rest, brought it home quickly. The ride was a short one and I had a prime spot near an open window, where it didn’t take long to catch a tiny cinder particle in my eye (ouch). Later, as I was photographing the engine, the wind shifted and a shower of soot was my official welcome to the good old days of steam. Each of those sensations: sight, sound, smell and touch contributed to my aesthetic experience and memory of a working steam engine. Recalling such memories is to experience those feelings again and again.
We primarily think of aesthetics in visual terms, such as an object with a pleasing well-balanced shape. But the concept goes deeper than mere appearance. In the original Greek, it actually refers to the capacity to understand and appreciate beauty and our sense of satisfaction or even pleasure we experience from the object.
Our encounters with trains take many forms. My own experiences are of watching the slow deliberate motion of a switch engine and handful of cars tiptoeing along sketchy track, accompanied by the sound of squealing flanges forced to follow a predetermined path. In the background is the low steady drone of a diesel’s power plant as the engine idles along at an easy pace. Visually, there are the myriads of details, both large and small, that characterize each element of the scene. Capturing the essence of these things is what drives my modeling.
Studying freight cars, I learn to see and appreciate what makes each one unique as an object. There are differences large and small, subtle and bold that define the character of each and help to shape my aesthetic experience of them. This knowledge also makes me less tolerant of the compromises normally accepted in modeling. We expect our models to perform in a manner guaranteed to wreck havoc with a full-size car, yet never consider how incongruous this might be. From my own experiments I’ve discovered that many of the excessive tolerances in common use are largely unnecessary.
Working with P48 hits the sweet spot for me in terms of the detail one can include along with the ability to model enough of the context that brings the models to life. P48 also speaks to the standards that I see in the real world. With the aesthetic experience I seek, there is little reason or need to compromise. I hasten to add though, that the concept of better is in the eye of the beholder. A modeler, whose vision requires 50 locomotive and 200 freight cars, will have vastly different ideas of what better entails. It’s something that needs to be duly considered in any discussion like this.
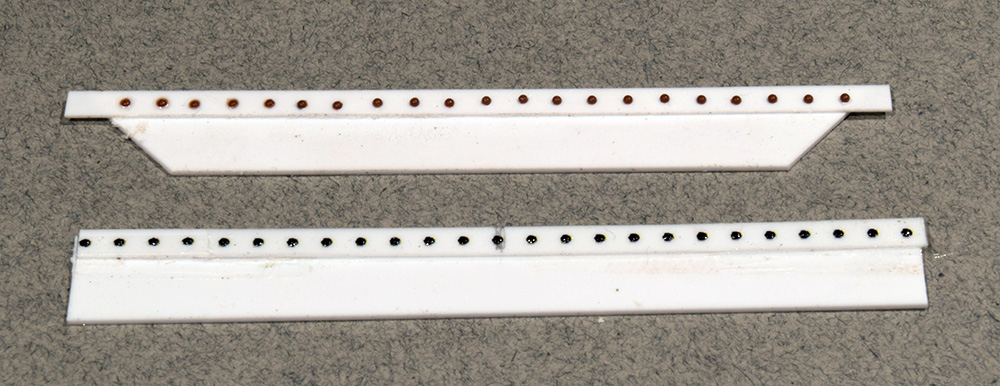
In This Case You Can Trust Your Eyes
In the image below, the section on top has Tichy rivets and the one below feature Archer decal rivets. It’s strictly a matter of preference but to my eyes, the Tichy rivets have a sharper, cleaner appearance.
I problem I had with them was drilling a straight line of evenly spaced holes in the centersill sections. Doing the layout was simple but as you can see, even with my drill press the holes would drift off-center vertically. This wasn’t acceptable.
Thinking things over, I tried the Archer decals but didn’t like them as well. My own experience confirms what many others have said in that they are finicky and delicate.
I came up with the jig in Photo A of the montage shown below. It’s simply styrene scraps with a length of brass featuring two carefully spaced holes.
My idea was to drill two holes with each pass, but one of them was off by a tiny fraction, so I simply don’t use it. The procedure is outlined below.

(Photo B)
I slide a length of centersill under the brass until the leading edge is visible, then using a square, I bring it even with the edge of the brass strip, and using the hole on the right of the fixture, I drill the first hole. The built-in channel of the jig is a friction fit that aligns the work piece in place, yet allows me to slide it back and forth.
After the first hole is drilled, I advance the work piece to the right until that hole is visible, then I lightly re-insert the bit and bring it backwards until it makes contact with the edge of the brass strip, then I hold the work piece in place and drill the next hole. This gives me the correct four-inch spacing between each hole. I simply repeat this procedure until all the holes are drilled.
(Photo C)
Tichy rivets are notorious for flying away when cut. I take a piece of painters’ tape and roll it with the adhesive facing out, stick it to the bench and press a sprue of rivets on it. Then I can cut them free with a chisel blade in my knife. As seen in Photo D, the tape holds the loose rivets in place, yet they are easy to pick up with tweezers. This saves me a ton of time and frustration.
(Photo E)
While the final result still isn’t machine perfect, it is acceptable and far better than previous efforts.
Regards,
Mike
Hi Mike,
Did you consider a pin through the jig and first hole so you are not relying on vision to line them up?
Also, I find some NBW castings are off-centre. You may want to check your rivets.
Finally, I like your method of capturing the castings. However, you should find parts don’t fly away if you slice instead of chop them off. Stick one end of your blade to the mat and rotate it through the spruce, rather than pushing it down parallel to the mat.
Cheers!
Rene
Hi Rene,
Did you consider a pin through the jig and first hole…
Apparently I didn’t do a good job of explaining the process. If you look again at Photo B I’m using the drill bit in the manner you suggested. I drilled a hole in the side of the centersill, then moved the workpiece to the right until that hole is out from under the brass plate. Then, I insert the bit into the hole I just drilled, slide everything back until the shaft of the bit touches the edge of the brass plate, then I remove it and drill the next hole in line, repeating the process as often as needed.
Yes, some of my rivets are likely off-center, which adds to the sloppy look. It’s something I’ll live with for now as my supply is running low. In addition to keeping the rivets from wandering off, the tape also makes it easier to find them on the bench. I also know which end is which when I pick them up with the tweezers.
Regards,
Mike