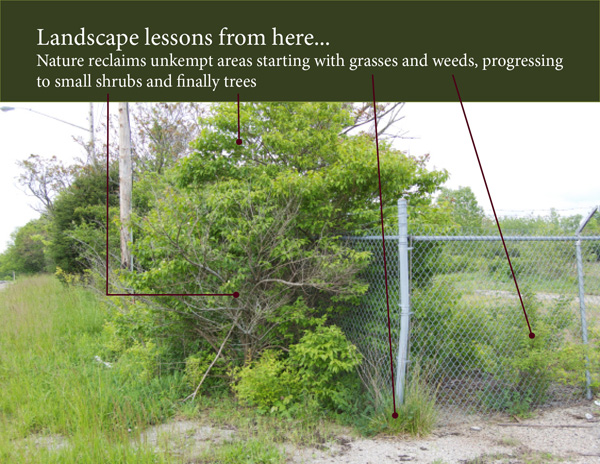
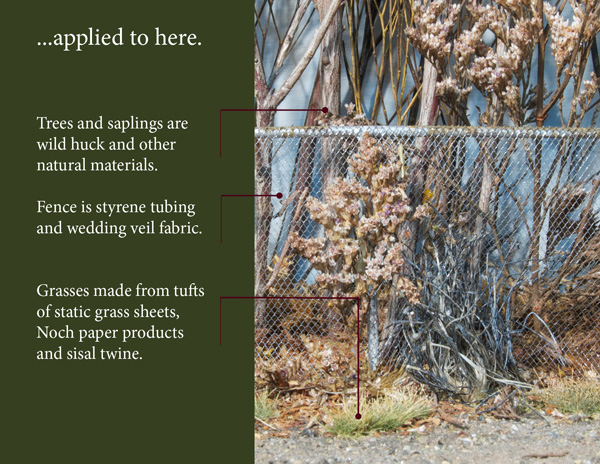
I’ve been upgrading some of the first areas of scenery on the layout, using new materials now on the market. Products like static grass sheets are significantly better than the older stuff. As the two photos show, the landscape can be studied like any other prototype and the knowledge applied to modeling. I’m just beginning to learn what the landscape actually looks like, even though I have been in the hobby for decades. I’m discovering I have a lot of preconceived ideas to overcome and that they die hard.
Here are some of my personal lessons:
1. I think I tend to overdo the number of trees in a given area. While the number of saplings in a woodland can be dense, the amount of sunlight, water and soil nutrients each can get goes a long way in determining the number that survive and thrive. In the model photo, I feel there are too many trees behind the fence. I do this to visually fill in the spaces but I need to look more carefully at what is actually going on in the real world. Another lesson to keep in mind comes from my art training. As you reduce an image, the objects and the spaces between them both shrink. This fact needs to be taken into consideration. In the case of the trees mentioned, I neglected to think about the spacing between them. In looking at this photo, which provides a more objective view, I think I need to thin out some of the clutter behind the fence.
2. Despite my artistic knowledge, reproducing color is a major struggle for me. This is why I prefer the use of natural materials whenever possible. I let nature do the coloring. In looking at areas I’ve refurbished on the layout, I need to do some blending of color between the new and old. Things look a bit garish in places, such as the clumps of static grass I’ve added. The bright green needs toning down. You’ll notice the different shades of green in the first photo. Taken in mid-May 2012, the grass is a brighter yellow green, while the tree leaves range from lime green to darker shades.
Another example is the tall shrub made from a chunk of sisal rope near the fence in the second photo. The gray spray paint is all wrong for this type of shrub. They’re actually more grayish beige, but attempts with that color look even worse. Color doesn’t scale down directly. It has to be manipulated in tone and value to look natural at the smaller scale. You have to observe and think things through. Forget what you know and model what you see.
3. Evaluating your modeling from close-up photos is an excellent way to gain perspective. The camera simply does not lie and allows you to see things as the really are. For example, that tall bushy sapling in front of the fence post looks phony to my eyes in the photo. The dried flower buds of the plant don’t resemble leaves in shape or color. Now that I’ve noticed it, it will bug me until I do something with it. Some will say: “Oh hell, leave it.”, especially since it is in the background. I can do better, even with background scenes. More important to me, I want to do better.
Rendering scenery doesn’t have to be the subjective exercise in generic modeling the hobby has practiced for decades. Like many other aspects, one can take it as far as one wants.
Regards,
Mike
The inspiration for this post came from looking at photos of Australian modeler Geoff Nott’s work (a link appears in the post A Matter of Perspective). I’ll never look at model scenery the same way again.


Mike,
One thing about stands of tree (“the woods”), no one remember some of the trees loose branches or the fact that they do in time fall over. In observing the “woods” around our house there are a fair amount of both branches and trees on the ground.
Matt
Matt,
Thanks for commenting. You’re the only one who does on a regular basis and I appreciate your participation.
You’re right, there will be many dead branches and trees in a wild woodlot. We can do a better job of observing the prototype (i.e. the real world) for such details and they are simple to include in a model scene.
Such details tell a story about the scene being modeled. As you can see in the photos of my early post “A Walk On The Wild Side, the ground in a virgin forest (one that has never been logged) will be quite open and easy to navigate. In a second or third growth woods, the ground will be overgrown with smaller shrubs, brambles and other growth that gets established before the tree canopy blocks out the sunlight. Once understood, details like this tell a clear story, and add another layer of interest.
Regards,
Mike
Mike,
I enjoy your posts, very thoughtful and have made me do a second take on design. Keep up the great work.
I could not agree more with your comments on virgin vs 2nd/3rd growth woodlots. Living in an area that was once mostly farmland and small woodlots in steep areas, it is amazing to look at the woods around me. Even on my own property in 14 short years, I have seen an old small pasture overrun with small pine trees from pine cones by a large pine uphill.
Other thing I see is your chain link fence, my steam area time period has wooden fence posts and wire in most cases. Even a chainlink fence can define the era and location (urban vs rural), very useful in my self-imposed limited width layouts.
Reproducing color, especially the full array of Fall colors, and the various shades of Summer greens is indeed a difficult challenge. Looking forward to some new thoughts on that thread.
Matt
Matt
Hi Matt,
As I’ve written before, there is a regional arboretum in Richmond. I’ve spoken with one of the staff about how a forest develops and he said the pines and scrub cedars are among the first trees to get established. This is evident in a vacant field next to my house where cedars are gaining a foothold along with other invasive shrubs.
The matter of color is as tricky as it gets in modeling, which is the reason I choose bare trees over summer or fall colors. Most attempts at fall scenery come up short to my eyes by being too garish. The colors have to be toned down to look correct. At least in my view. Another principle from art applies here. Keeping the perspective of a scale in mind, we have to account for the atmospheric perspective seen in the real world. I’ll pick on N scale again because it’s such a good example.
With the implied distance of the panoramic perspective of N scale, you are looking through many layers of air, which is comprised of billions of water vapor droplets. These droplets alter the amount of light and the color wavelengths that reach our eyes, which accounts for the color shifts we perceive in distant objects and, the haze we see from summer humidity.
All of this alters the color of the landscape and is something seldom taken into consideration when modeling. What it boils down to is the colors need to be toned down or “grayed.” This sin’t anything new, it’s just not conveyed much in articles anymore. I guess it’s now assumed knowledge. I’ve also read of some modelers who have added subtle amounts of blue to the background colors of their scenery to replicate the effects of the atmosphere. This can be very realistic when done carefully.
The modeling scale plays an important role too. The larger the scale, the less atmosphere we’re supposedly looking through, which impacts the perception of color. So don’t take my N scale example as the gospel for everything. Quarter-inch scale can have the atmosphere effects on the backdrop with the foreground 3D scenery in slightly muted colors. That’s what I’ve tried to do on my layout with varying degrees of success. I haven’t mentioned how lighting plays into all of this because that’s a whole other subject of which I know little.
You’re also right about the fence style. Little details like that say a lot. Good comments Matt. Thanks for posting.
Regards,
Mike