Scribe two lines, then drill a hole where they cross. It should be simple right? Well, maybe.
This week I took my first steps ever toward learning to work with brass. I’ve been contemplating this for an embarrassing length of time, wondering whether I would stay with it through the steep learning curve. The time invested so far is nothing with regard to what is ultimately required, so it’s far too early to draw any conclusions.
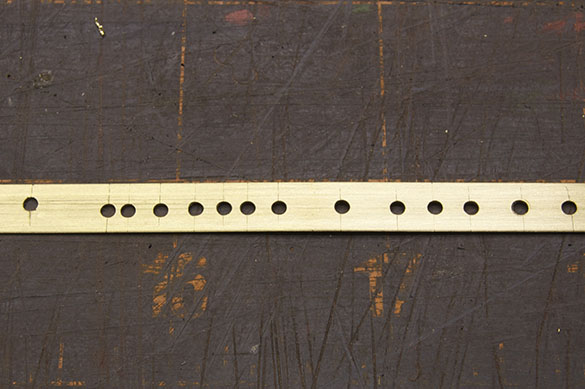
My first experiments involved practicing kindergarten level skills, such as doing centerline layouts and drilling precisely located holes (photo above). These are foundation level skills upon which all others are built. Without them, one may as well return to the armchair.
We’re all grownups here, so in considering the work in the photo, lets use the proper terms:
This is a failure.
As is clearly seen on this practice strip, none of these holes are on center or even in a straight line. There are several reasons:
1. It’s a first (the third actually) effort, so expecting perfection is irrational.
2. I simply need more practice. A lot more practice.
3. The lighting at my bench is inadequate and improperly located for such work.
One or two of the holes are close but the exercise highlights the greater precision metal working requires versus using wood or styrene. Metal also requires a deliberate mindset and focus in order to do the longer tool setups and precise layouts, all of which will come with time and deliberate practice.
Deliberate Practice
To summarize: deliberate practice is far more than mere repetition. In deliberate practice, you make an attempt at the new skill or technique, then stop and evaluate what happened. You make adjustments as needed based on your observations and try again, repeating this process until you’ve mastered the new skill.
This practice-then-analyze routine differs significantly from simple repetition because of the ongoing feedback you receive. Let’s break it down with my hole drilling exercise.
My first attempts revealed that I had the material poorly positioned in the vise. The workpiece was too low and the jaws obstructed my view while lining up the drill bit. I also had too much of the bit sticking out from the chuck, which created a lot of flexing and skip when the spinning bit met the workpiece.
My third attempt shown above, took these factors into consideration. I found a different way to secure the workpiece that allowed a better view and inserted the drill bit as far into the chuck as it would go. To fix the skipping problem, I made a dimple at the intersection of the layout lines to help capture the drill bit. Making the dimples revealed a new set of problems that will require their own practice. However, as seen in the photo, the outcome was better but still not where I want to be.
Deliberate practice provides a more focused learning experience than just drilling a bunch of holes and hoping for the best. At each step you have the chance to learn something relevant and this is how you will improve quickly. For a deeper study of what deliberate practice is and is not, I recommend Geoff Colvin’s book Talent Is Overrated. (I get absolutely nothing out of this link.) Even though it isn’t specifically about modeling, it’s a good book that you’ll find helpful for learning any new skill.
Developing a new skill opens doors to greater enjoyment
I’ve long admired the skill of people who work with brass. Editing articles by Tom Mix deepened my respect of the work involved to model at his level. The Model Railway Journal and the blogs of many fine modelers from the UK that I follow also inspire me to take the plunge. To increase my knowledge base, I hope to add Wild Swan Publication’s fine two-part reference books on Locomotive Modelling by Geoff Holt to my library very soon.
I will clarify up front that I don’t have any desire to scratchbuild a steam locomotive or even a diesel in brass. I’m afraid I’ve waited too long in life to learn those skills and, based on my experience so far, I can confirm that for very fine operations, my vision is going to be an issue even with a magnifying visor. I’ve entertained the idea of building a GP38-2, which I’ve mentioned on the blog, but doubt whether that project will ever happen. I have a Red Caboose GP9 and an RY Models S12 on the roster and that’s more than enough motive power for the layout.
So why do this?
Because I want the challenge and the learning experience it affords. Because I don’t like feeling intimated by a material I’m unfamiliar with and, mostly because the rewards of success will be worth every minute of the frustration I’ve already experienced during the process. In addition, having even the most basic skills in working with brass will increase my modeling capacity by opening doors that were previously closed.
I’m not naive in thinking that it will be easy. I have a great deal to learn and understand and I get discouraged and frustrated easily. However, with the benefits of deliberate practice now experienced, I’m going to give it a go by taking one step at a time. With the time freedom a small layout affords I can lavish this kind of time and attention on mastering a new skill.
Regards,
Mike
Mike,
Good to hear that you are getting to grips with metal!
Pop-marking the cross-point of the centre lines is essential when drilling holes without a pillar drill (and good practice even then, if it helps to centre the workpiece correctly). Other than a sharp point, what to use for making the “dimple” is secondary to technique. The obvious tools are a centre punch or a spring-loaded “automatic” centre punch, but a fine drill in a pin-vice can be used (twiddled, not tapped with a hammer!) as can a flat headed nail in an emergency.
The technique, which I was taught many years ago by a tutor on an course of evening classes, is to get close to the centre, and lightly move the point of the punch towards one of the scribed lines, and when it meets the faint groove, to slide it along the groove until you reach the other line. No pressure is applied, the weight of the punch or pin-vice/drill is sufficient.
The ore way of doing this is to invest in an optical centre punch, which uses a glass false punch in a holder to locate the centre – the glass is shaped to magnify the image – which is removed and replaced with a small punch, which is tapped lightly to make the centre mark.
For anyone wanting to enter into the fascinating realm of metal-working, I can do no better than recommend Peter Wright’s book, “Model Engineering: A Foundation Course” (ISBN-13 978-1854861528), with which I have no connection, but it is well-written and reasonably priced. It covers everything Fromm the basics, up to using machine tools.
One area that puts people off metalwork is soldering, about which too much has been written and people treat it as an arcane art. In practice, it requires two things only: cleanliness and sufficient heat. Cleanliness is obtained by abrasion (scouring pads are ideal for this) and chemicals (flux – 9% phosphoric acid is fine for nearly every use – and I use a bit-cleaner/tinner every use as well as wiping the tip of the iron on a damp sponge each time I put the iron back). Sufficient heat comes from having a big enough iron, and the right solder. A 25W iron is ok or most jobs, but a 40W is better – for small jobs, you get in quick and out quick -especially for O scale. I use a 50W analogue temperature controlled iron nowadays, the purchase of which significantly improved my soldering (a bit like buying a decent dual-action airbrush after using a cheap one). I only use two solders: 70C low-melt for white metal, and basic tin/lead for everything else. It is important with the latter to get the right sort: it needs to be 60:40 in favour of the tin, otherwise it won’t be strong enough. Trevor Nunn uses the tin/lead solder for everything, carrying a blob of solder to a well-fluxed joint when working with metal, and touching that and not the iron to the metal.
Hope that all helps.
Simon
Hi Simon,
Yes, I’m finding that brass isn’t as scary as I thought. Getting over the mental barrier I put up is the hardest part. Thanks for the tips, I’ve already put some of them to good use and will share the progress next week in the regular post.
Regards,
Mike
Mike,
Glad to have helped! In return, you have reminded me how much I enjoy metal work, so you may have played an unintended part in helping back to the modelling bench.
Nickel silver is nicer to use than brass, but is harder to find and costs more. It works more easily, and doesn’t transmit heat away from the soldering iron as readily. If you can get hold of pure nickel, it looks very much like steel – metal spatulas are usually a good source of this.
Simon