Modeling Track In The Street: An Evaluation
With more work on the sample, this is what I came up with. Some things worked and many others didn’t and I’ll say from the start I’m not happy with this outcome.
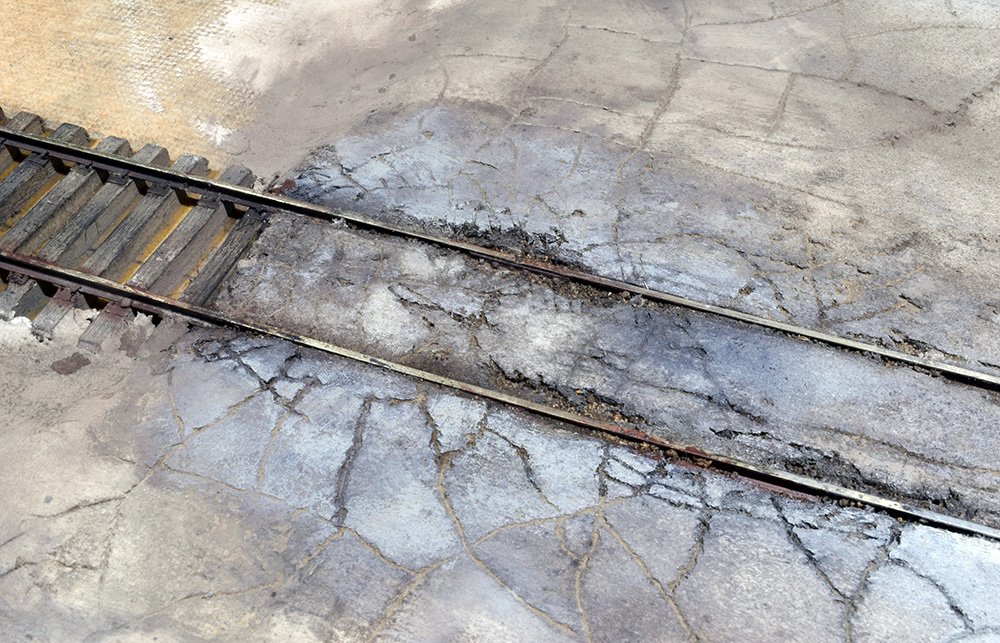
The foam board is lightweight, which is a plus, however, I don’t like the way it carves. The cracks are too big for my taste. On an actual street there are a few large cracks but many smaller ones and it was hard to produce the finer cracks. I found it frustrating and I may have used the wrong tools and methods. The foam is too soft and wants to tear instead of break like a coat of plaster would. I also went crazy with the volume of the cracking as you can see and it looks contrived to my eyes, more like a cartoon than a natural process. I need to study my references more.
Not what I want to see. The cracks are too wide, the texture looks off to my eyes and the surface is too fragile as evidenced by the white spot where I tore the foam. Back to proven and more familiar methods.
I was surprised at how well the foam took the color washes. I used denatured alcohol as a thinner and had concerns about it affecting the foam. My fears were groundless. The color went on nicely and I was able to vary the depth quite a bit. I built up washes and dry brushing in my usual manner and was pleased with the area in the center of the track. I’m also happy with the mud around the buried joint bar.
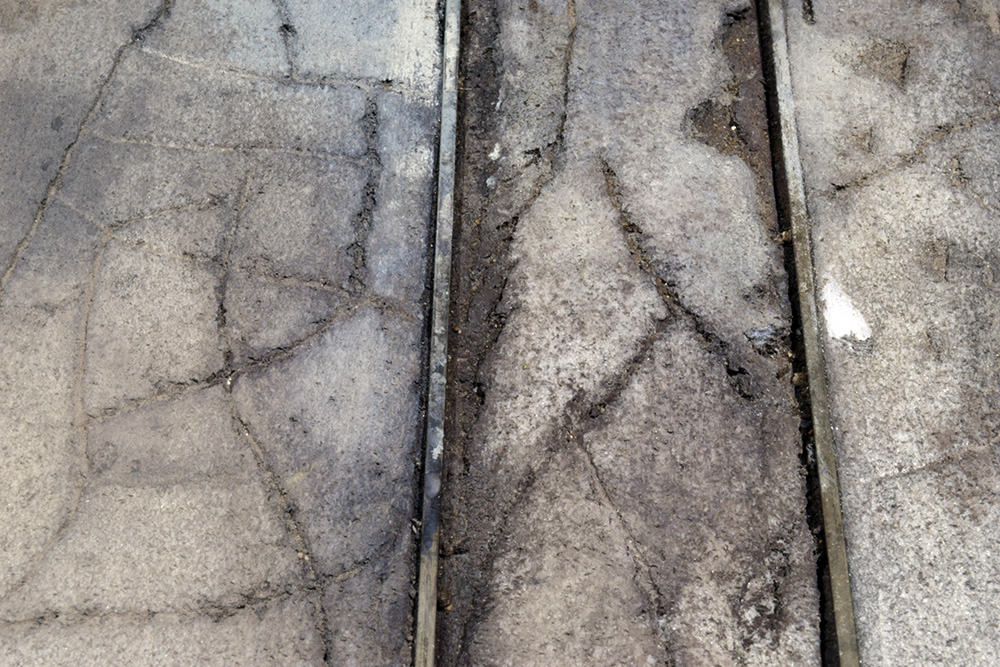
As an experiment, nothing was lost. The idea was to learn the working qualities of a different material. I think the foam would work better as a well-maintained surface rather than a worn one. As you can see in the photo above, it’s very fragile and easy to damage. I tore a chunk out just from cleaning the railhead with a wooden strip. I would hesitate to use the material in a foreground application.
The bottom line is that foam doesn’t have the working properties that will give me the results I want. I will scrape the top layer of foam off and trowel on a thin coat of drywall compound to the depth of the rails. The bottom layer of foam will reduce the volume of mud needed and that should decrease the overall weight. For a small sample like this, weight isn’t a concern, however on a larger cameo or layout situation, it might be. The experiment continues.
Mike
Previous Posts In The Series
Mike
I’m working on project that will include track set in pavement. I have been planning on using using a foam board product called “gatorfoam”. is that what you were working with here?
Hi Larry,
I believe they are two separate products but, to be honest, I’m not certain how they compare. I used a product known as foam core board. It’s only 3/16 to 1/4″ in thickness and 32″ x 40″ in size with a facing paper laminated on both sides. It’s used a lot in picture framing as a backing board for the art and glass in the frame. The foam in the core is pretty soft and I believe the gator foam is more rigid and dense for a given thickness.
The foam didn’t work for me because I couldn’t get the effects I wanted. That doesn’t mean it wouldn’t work as a street surface. It depends on what you want in the finished pavement and how much abuse the surrounding area might have to take. On my sample I gouged a hole just trying to clean paint off the railhead with a stick. I would mock up a test section before committing to a larger area.
Regards,
Mike
Mike,
I am trying to do this very same thing in HO scale. Do you have a previous post listing your steps for doing this that I could follow up on?
Anthony
Hi Anthony,
Try this one: http://www.ostpubs.com/concrete-platform/ This one might also be useful:
In the next post I’ll cover what I did next to the sample.
Hope it helps.
mike
Hi Mike, I’ve been kicking around an idea in my head about simulating cracked concrete. (Maybe it won’t even work..) I took some grout mix, added some water and matte medium for flexibility. Then I spread it out very thin over waxed paper. I give it a day to set up then transfer it to my layout where I have the scenic cement waiting. I then deliberately crack it up with my finger and let it dry
Hi John,
Sounds like it would work well. I did something similar by casting thing sections of Hydrocal in a styrene mold. They also cracked naturally.
Mike
(On the number of cracks) is it the pattern and the story they tell? I believe paving surfaces crack for a reason.
Perhaps the passage of trains causes the pavement to flex in a way it can’t and that causes the cracking?
Maybe the base was lousy and didn’t drain correctly? Or froze and then snapped?
Just thinking casually out loud on the subject. That those cracks in the pavement themselves are a record.
Chris
I’ve never tried this use of foam core before and I wanted to have a try.
I started with a square of possibly the same foam core and just as you did, I peeled off one side of the paper, exposing the foam. Then the carving begins.
First I’ve tried just carving the unpainted foam using an Xacto knife. Just as you found, the back of the knife does drag in the foam and creates a trench. I then used the cutting edge and the cracks are fine but I worried they’d fill with paint (they did).
I’ve started painting. I figured I’d paint a coat of black first and wash into it lighter colours to fade out the asphalt. As I suspected, the nice cracks I carved did fill with paint.
The paint’s still wet as I type this but I tried carving into it reasoning that I would literally cut through the lighter colours to expose the black undercoat. This is working so far.
I don’t like the colour of my sample but I have a better appreciation now of what the technique you’re using involves. I might try drybrushing some additional colours on tomorrow. If there’s anything worthwhile here I’ll share a photo.
Chris
Hi Chris,
It’s the shape of the cracks that really bothers me. they are too wide or big. I used the back of a dental tool, which didn’t allow for much variation. Thanks for reminding me that the cracking in the surface tells a story. It’s something I’m also learning from Mike Rinaldi’s work: each scratch, chip or spot of rust is there for a reason. It isn’t just because the modeler thought it looked cool as is the case with so much of the hobbyist mindset.
I’m gratified to hear you’re doing your own experiment with the process.
Regards,
Mike