Modeling Track In The Street
Chris Mears posed a question on his blog about motivation. He wonders what motivates us to do what we do? What draws us to the workbench and our subject matter? As he suggested there is no single answer as we’re all unique individuals with equally unique motivations. Still, it’s a good question to ask.
My motivation is the gap I see between my own work and the work of people who are more experienced than I am. Narrowing that gap is my motivation. It’s not a competition; it’s the urge to improve. It’s the desire to render a subject as best as I can and the knowledge of how easily and quickly I tend to settle for superficial results. I have a long way to go and that’s a good thing in my view. It means I always have something to strive toward and learn.
Ours has become an exercise, where we go to great lengths in outlining the exact tools, materials and step-by-step instructions that reduce everything to a rote formula to the determent of our curiosity, critical observation and sense of experimentation. I dislike modeling on autopilot and defaulting to the same techniques I’ve grown accustomed to. For me it’s a form of complacency and coasting. That’s what I find myself doing these days.
You Can Always Return To The Fundamentals
I’m re-reading one of Michael Rinaldi’s excellent books on painting and weathering a small city tractor. Actually, I’m reading my copy in depth for the first time. What I take away is a better understanding of how nuanced a painted surface can be and how little attention we give to such things. Watching him demonstrate his techniques in a video I found was inspirational and added to my understanding of his methods.
I put my renewed enthusiasm to work by modeling a section of street track. I wanted to break out of my usual methods and materials and put my understanding of Michael’s observations to work.
The usual method for laying track: ties, tie plates, four spikes per tie. Out of curiosity, I tried these wooden strips to support the rails since the surface above is hidden by solid pavement. If I wanted to bury the track in dirt and ballast, I would place ties and the other details throughout because they would show here and there. The white 0.015″ styrene strip equals the thickness of the tie plates and is painted flat black like the tie strip material.
Keep Things In Scale
One thing he stresses is keeping the effects we create in scale. My scene features a section of unpaved track and for the visible ties I backed off on the amount of wood grain I applied. Inspired by my studies of full-sized track, I have a better understanding of how little wood grain would show when reduced to 1/48. It looked strange at first, and I wanted to emphasize it more but I resisted the urge to turn each tie into a cartoon caricature. There is enough effect here.
Color Has A Scale Too
I continued an earlier experiment with washes of Tamiya acrylics using German Gray (XF-63) and Flat Black (XF-1), building up layers of color one wash at a time, much as I would do with a watercolor painting. I wanted a more nuanced tone and coloring similar to what you might see in real ties. On some, I washed on the color directly, with others I flooded on the denatured alcohol first and then let the color wash flow as it followed the wood grain. I mixed in very light tones of a warm brown on a few ties, again using very diluted washes of color.
Some ties I like very much, others less so. I’m reserving judgment however, because there are more steps to come.

As much as I enjoy creating run down track work, it’s starting to feel like a cliche with me. This time I’m representing in service track that while older, is better maintained. My objective with the color was to create subtle tones that are in scale to 1:48. I also kept the degree of wood grain in mind to keep it in scale too. My past efforts feel heavy handed after looking more closely at full-size track.
Rethinking Pavement Options
I like materials that mimic their full-scale counterparts and I prefer plaster for modeling pavement. I like the texture of it and the ease of creating broken and weathered effects of old masonry. Another advantage of plaster for me is that I can pour large areas without a lot of fuss. I’ve shied away from sheet goods for roads because of the cutting and fitting one has to do around the track. For this little display, that wasn’t a problem.
One of several downsides to plaster is its weight. Even lightweight spackling adds up quickly over any amount of area. Another is the white areas that show up when it’s damaged in any way. You can pre-color the wet mix but I seldom did that on my old layout. For a traveling display, the risk of damage is high, so an alternative is called for.
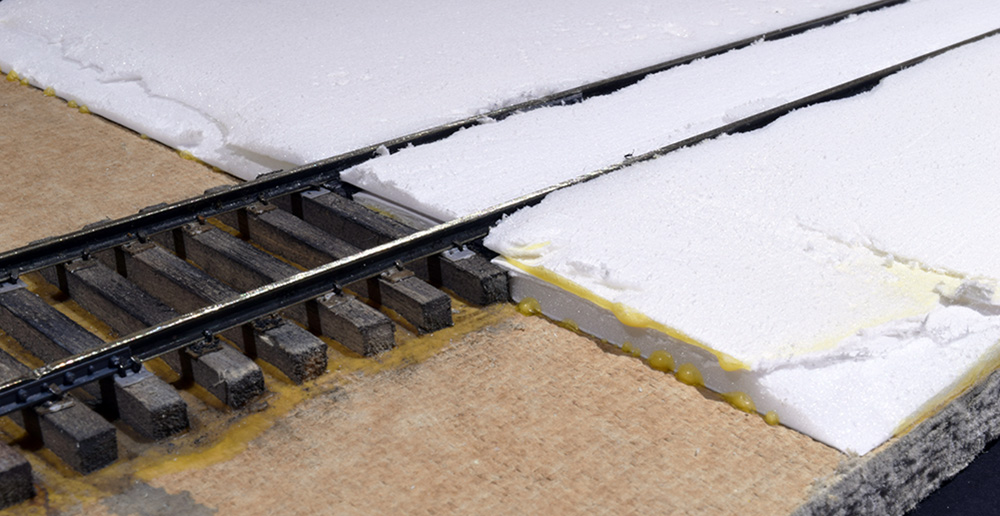
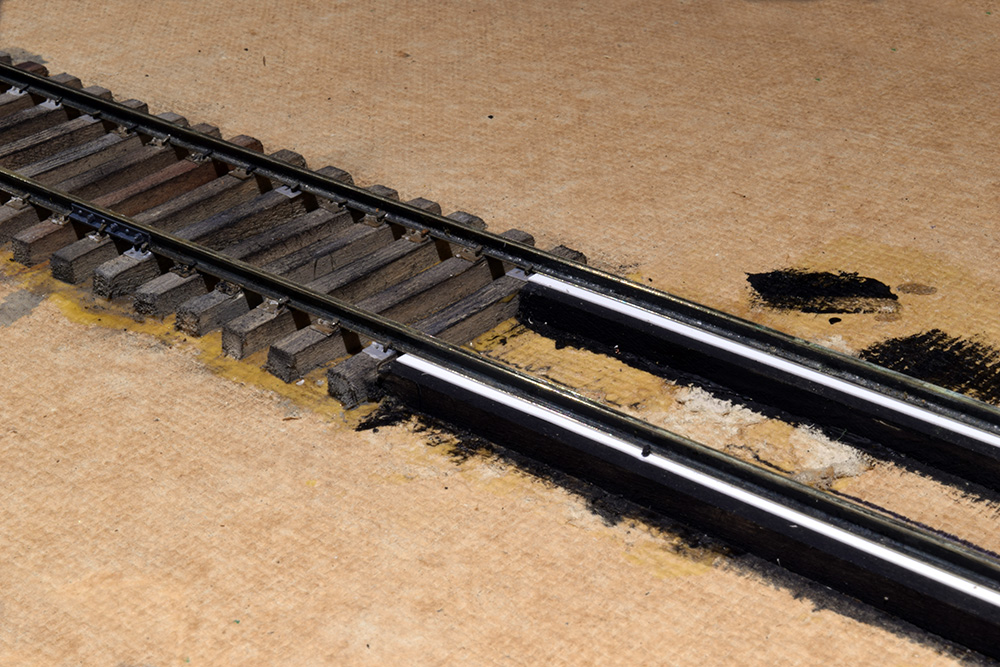
I used foamcore board as my street surface. My ties are 3/16” thick and so is the foam core. Therefore, I used two layers to bring the street surface up to the railheads. The bottom layer is just filler and I peeled the paper facing off of both sides on the top layer. Simply stripping one layer caused the board to curl due to the uneven tension. This is probably a non-issue but I didn’t want to fight the board when gluing it down. Carpenter’s glue and weight secured the pieces in place and fitting it around the short length of straight track wasn’t an issue. Of course, curves and turnouts are another matter. In a larger project, I would have to weigh my desired outcomes against the work involved in fitting pieces around complicated tracks. A hybrid approach seems the best solution.
Two layers of foam core are required. I spread plenty of carpenter’s glue down and rubbed the pieces back and forth for a good bond. I clamped each piece in place for an hour or two until the glue set up. Clamping may seem like overkill but I was afraid the moisture from the glue would cause warping.
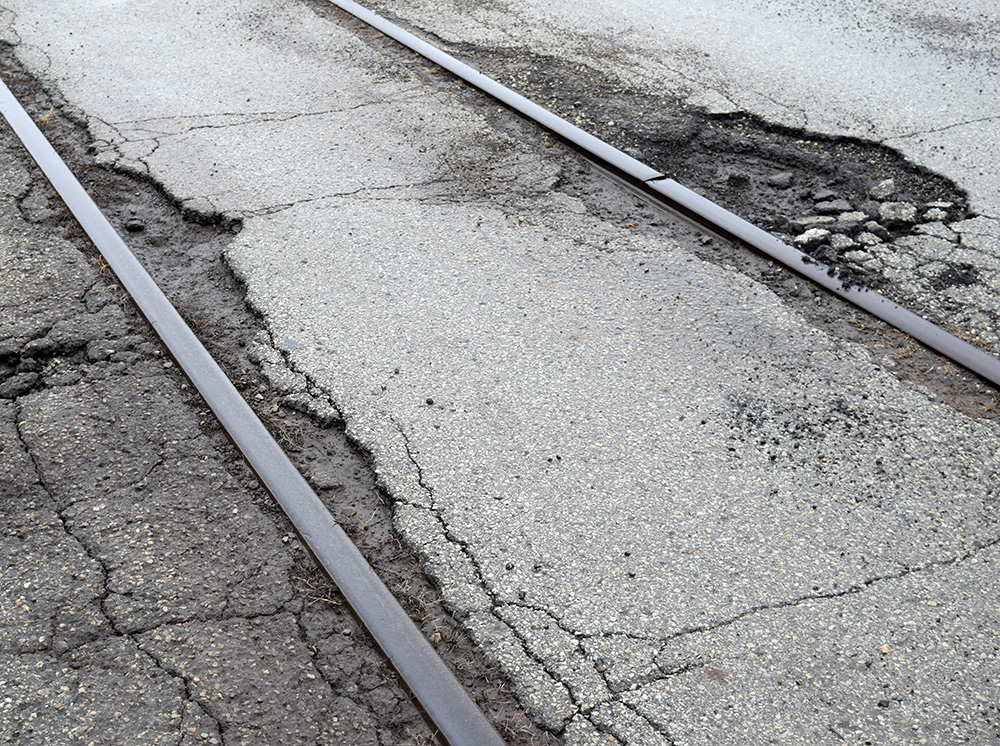
The cracked and crumbling edges near the track on the prototype is an important feature for me. While the foam has the right texture for asphalt it doesn’t crumble as well as plaster but, I have a couple of ideas I want to try.
I had to sand the second layer down because it was higher than the railheads plus I had to create the flangeways but both were expected. The foam of this material has a nice closed cell texture that mimics the appearance of asphalt well in quarter-inch scale. I’m undecided on how to reproduce the crumbling aspects along the rails and at joints. Initial work shows the material wants to tear instead of break away. I still have some experimenting to do and I’ll cover those outcomes along with the painting and weathering of the street surface in the next post.
Regards,
Mike
Relevant Links
First Post In This Series: Street Trackage
Chris Mears’ Prince Street Blog Entry: Inspiration…The Morning After
Michael Rinaldi’s Single Model Book Series SM.02 S-65 City Tractor
Michael Rinaldi’s Oil Paint Rendering Technique
Watch if you like, it’s an instructive session.
0 Comments