
Two Simple Workbench Hacks
I consider my workbench as another tool. Like a modeling knife, razor saw or pliers, the bench itself can be an asset that enhances your modeling, or hinders it via poor design.
I’ve found that having the right tool or fixture, easily accessible and ready to go, increases my enjoyment of the work many times over. I won’t share the number of ways I’ve jury-rigged or cobbled together a makeshift solution that left me frustrated and discouraged. My recent work on freight cars is a case in point. How do you hold a car steady when adding the end details? How do you keep the details on one end safe when working on the opposite end?
I remembered reading a post on Gene Deimling’s blog about his solution and I thought it was brilliant. Gene simply clamps a stiff metal ruler to his bench top allowing one end to stick out a few inches. He can then slip an open top car on the end of the ruler and clamp it in place for adding the ladders, grabs and brake components. I decided to adapt his idea and take it a bit further.
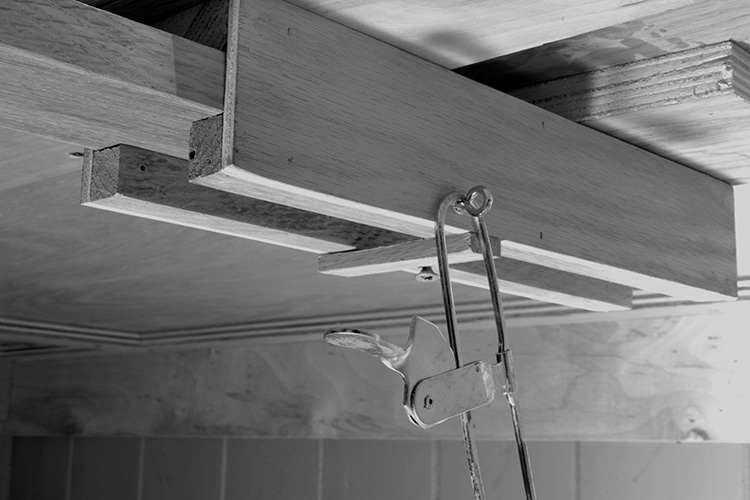
I didn’t feel comfortable using a ruler and I also didn’t want to clamp it to the bench for use, preferring instead to have something permanently installed and ready to go on a whim. With that in mind, I came up with the design seen here, using scraps of 3/4 inch oak and 1/4 inch plywood. The middle piece is slightly narrower than the inside dimension of a quarter-inch scale box car and pulls out like a breadboard writing surface of an old style wooden desk.
My bench top is 3/4 inch plywood with a 3/4 inch stiffener strip along the edge for strength. To mount the fixture I added a block of 3/4 inch scrap at the rear to keep it level then drove two screws from below through predrilled holes in the top piece. I made certain the screws were short enough not to poke through the work surface. To prevent the tongue from being pulled out too far I added another short screw that engages the stop strip on the bottom of the runner guides. If I need to remove the center piece, I can slide it out the rear of the fixture. I thought of adding a small knob on the front to pull the extension out but that would interfere with positioning the model. As seen in the opening photo, I drilled a shallow depth hole that I can grab with my finger tip. It’s also easy to push the tongue out from the rear.
The fit is snug enough to eliminate any wobbles but not so tight that it’s hard to slide in and out. For a little lubrication, I rubbed the edges and the runner guides with some candle wax. The wood has been kicking around the basement for some time and is fully acclimated to the environment, although I’m certain the change of seasons may require some adjustments to the fit.
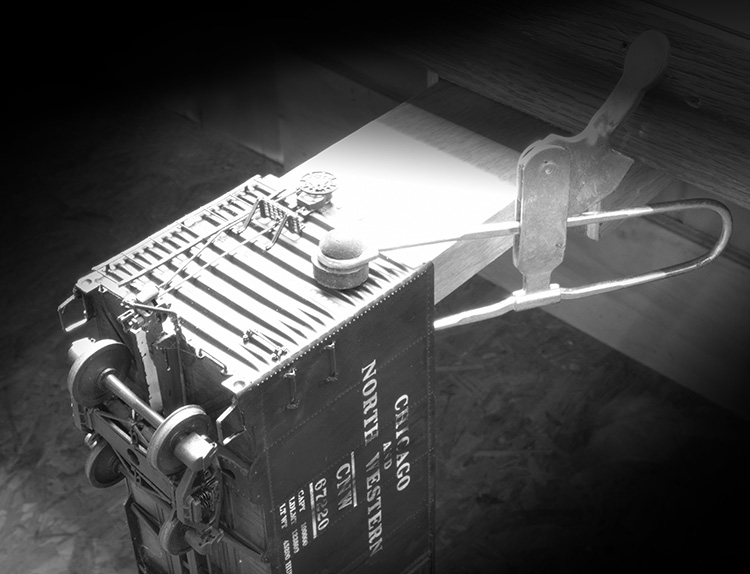
As the photo above shows, I can extend the tongue and slide a model on to it for adding those delicate end details. Along with sizing the extension to fit the model, the small cam operated clamp keeps it from sliding off and adds peace of mind. I also used a small screw eye on the side of the fixture to store the clamp between projects. I don’t have to go looking for it that way. I also think it would be good to find a way of capturing the inevitable part that slips away from me but haven’t thought of any good solutions yet. So far so good though. This works well for cars that have a separate roof or floor but obviously won’t work for a one piece car body like a resin kit. That will be another project. However, for the price of some scrap wood and an hour or less of work, I have a fixture that should serve me well for many years. Thanks for the inspiration Gene!
Scale Rule Holder
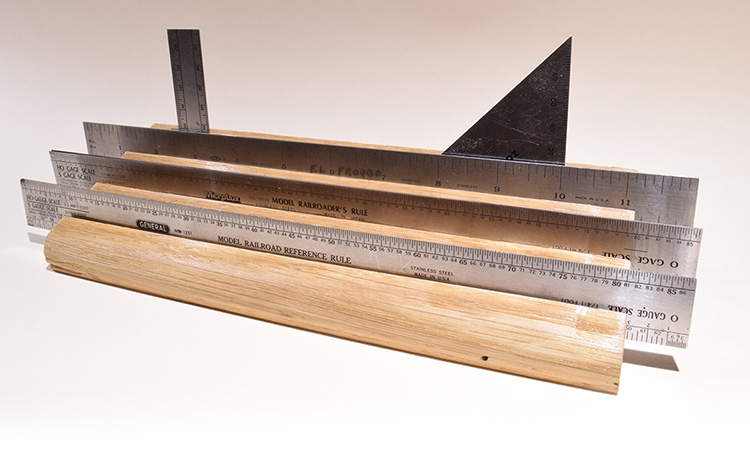
Clutter, in my view, is stuff that doesn’t have a permanent home when you aren’t using it. I prefer a tidy, work area but I understand that we all have different tolerance levels where tidiness is concerned. Several years ago, I made this holder (below) for my scale rules and squares to keep them off the bench, organized and easy to find. It sits on a narrow shelf at the back of my bench making it easy to grab a rule and replace it when I’m done. Once again, it’s just a piece of scrap with some angled saw kerfs and a block to hold it upright.
I’m slowly chipping away at these small enhancements and have several more on my short list of projects. They make modeling so much simpler and enjoyable that I wonder why I didn’t do them sooner.
Regards,
Mike
What great ideas, Mike. Thanks for sharing these!
As you probably know, I’m in the process of setting up a workshop and I’m on the lookout for good ideas like these.
Cheers!
– Trevor (Port Rowan in 1:64)
Trevor,
You’re welcome but full credit goes to Gene. I just modified his idea to suit my preferences. I’ve seen countless variations of the scale rule holder in the many books and magazines I have on workshop design and organization.
Regards,
Mike
An idea introduced to me by my wife, a jeweler, is the desk apron or catch tray
This is either an apron which you attach the bottom of to the underside of the desk when you sit down, or a fabric tray attached to the desk under the work area. Anything you drop falls into the apron and can be easily retrieved.
Obviously for jewelers working in precious metal then even the filings have value but for us it can still prevent loss or breakages.
Hi Tim,
I’ve thought of that idea but dismissed it. Considering how a car hangs down on the fixture, I’m afraid of making a careless move and damaging with an apron. I’ll just have to exercise care and if a part takes flight, well, it happens.
Regards,
Mike