I’m working on a fire escape for one of the buildings on the module. Made by Ken Hamilton of Wildhare Models, this is my first etched brass kit. (See the link at the end of the post,)
I’ve always been intimidated by working with metal and until recently, my only experience with soldering consisted of attaching feeder wires to the track. Not exactly a demanding task as far as skill level goes. I’ve looked with envy at all the etched brass details used by military and aircraft modelers and my attitude changed after I managed to successfully fabricate ladders, door tracks, and crossover platforms for my PS5344 box car.
In this scene, I want a mix of older and newer details that will contribute to the story I’m sharing. The full-sized building has a decrepit wrought iron fire escape that would add tremendous character to the model. To my surprise and delight, an Internet search yielded several options for quarter-inch scale fire escapes and when I saw the Wildhare kit, it was a done deal. I didn’t know if my skills were up to the task but I wanted one regardless. Ken’s etched brass model has a different ladder design and is a bit ornate but it would still work for a building dating to the 1800s. What follows isn’t a product review as much as what I learned while working with the kit.

Examining the frets upon arrival, my first thought was: “Wow!” followed shortly by: “Wow, there are a lot of really tiny pieces here.” Reading through the excellent instruction sheets greatly eased my anxiety as the assembly procedures are clearly outlined and straightforward. I can’t say enough about the clarity and completeness of the instructions. I was able to tackle each step with confidence thanks to the full color photos that show how to position the parts for bending and assembly.
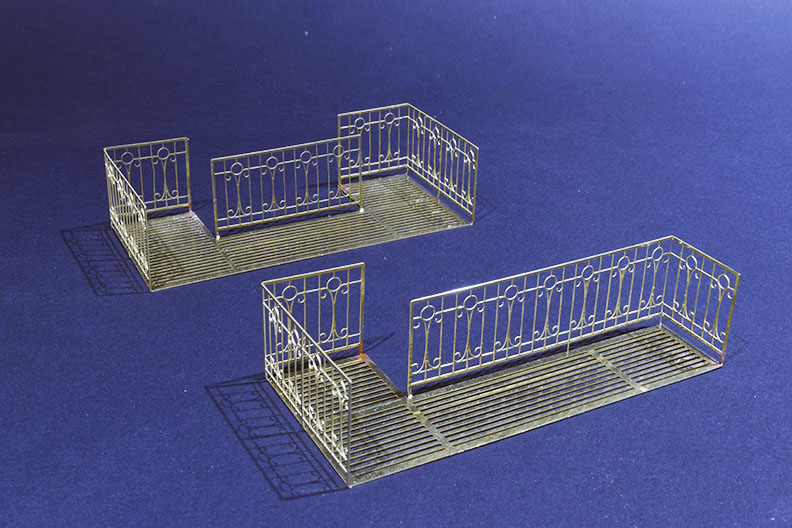
Made from 0.010” thick brass, most of the work involves bending the platforms and connecting ladders to their final shapes and securing them with built-in tabs. The instructions suggest one can use solder or CA and I chose solder for additional strength as suggested by the text. The kit includes a piece of softwood as a bending form but I used a method I was more comfortable with. Bending each platform was simple thanks to the design and only required soldering two tabs to hold the railings in place once they are bent. Soldering these was good practice for what comes next.
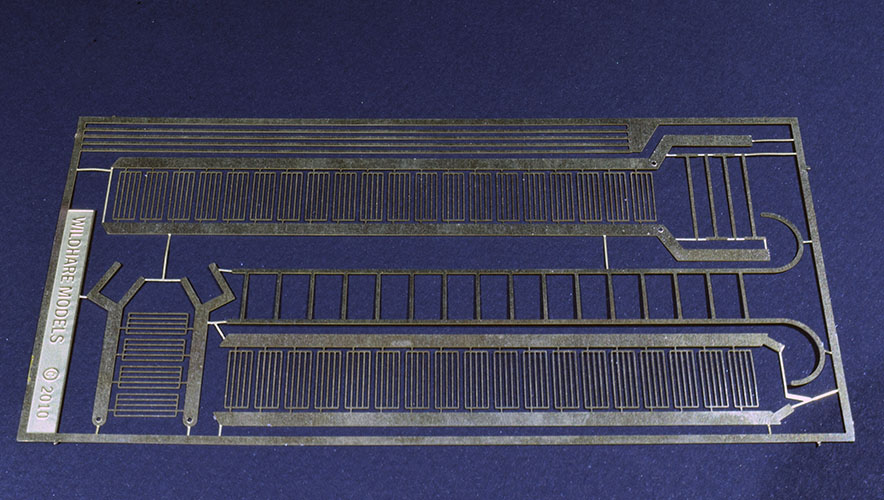
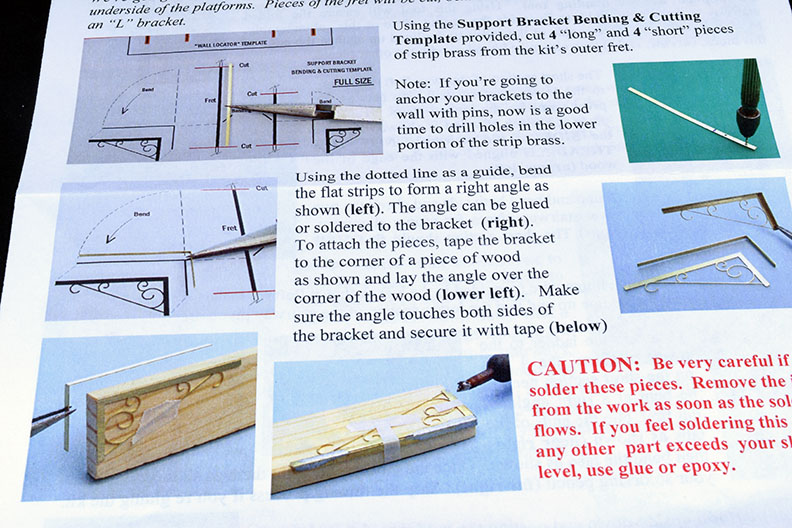
The support brackets require two pieces, one of which you have to make. The brackets are a delicate etch with lots of Victorian filigree that you solder an L shaped strip to. One has to cut this strip from the perimeter of the frets, measure to length and bend. A measuring template is provided to cut and mark the strips.
Soldering the strips onto the brackets stretched my skills and confidence. The instructions outlined a way to hold and align everything with the wooden block but I went a step further and employed my Panavise as a third hand. Over the course of two work sessions on separate days, I successfully completed all eight brackets. The lessons learned were about working slowly and backing away when frustrated. Making certain the parts are aligned is important and a piece of wet paper towel for a heat sink saved the day more than once. This is some of the most delicate work I’ve ever attempted and I’m pleased with the results. I learned more about soldering in three or four hours than in the many years prior. When doing fine work, half the battle is figuring out how to do it. The actual soldering process went quite smoothly once the parts were ready. The sense of accomplishment I feel is tangible and a great boost for approaching the remaining work. As you can see in the photo however, some of the delicate scrollwork suffered a bit from my rough handling and cleanup. I’m not going to obsess about the damage. In the era I’m modeling this fire escape would be old and bent with broken details.

I’m now at the point where I have to make a choice. I wanted to have this kit on hand so I could see how it would fit the building. I haven’t started the structure yet because I have to decide whether to modify the fire escape to fit the building or build the structure to fit the fire escape. The choice is driven by the distance between floors and whether the fire escape’s connecting ladder needs to be altered in length. As it looks now, I will likely modify the building since I plan to scratch build it. Fudging a few brick courses on the model will be simpler than modifying the kit but I really won’t know until I lay things out.
This is the kind of modeling that I enjoy the most. Modeling that challenges my mind and my hands with new materials and processes. Modeling that takes me places I’m not certain I can go initially but soon discover I can. You’ve read this before in my posts but until you experience it for yourself, you won’t appreciate the truth of it. I still have the most challenging part of the kit ahead of me: the handrails for each ladder section. These are also multi-piece, delicate assemblies that will further test my skill with a soldering iron. I’m looking forward to that.
The experience with this kit has increased my confidence as a modeler and I want to keep growing my skill base, which will open doors to different modeling subjects that I might not have considered before.
Regards,
Mike
Wildhare Models
I have no connection to Wildhare other than being a satisfied customer.
Excellent, Mike.
The workmanship is good: if you hadn’t admitted to your lack of soldering experience, I wouldn’t have known.
More importantly, this is a perfect example of everything you talk about in TMC and on this blog: fine detail, overcoming reluctance, learning new techniques, great modelling and most importantly, reward through accomplishment. In short, finescale modelling in a nutshell.
Incidentally, I have found purple Scotchbrite pads to be exceptionally good at cleaning surfaces prior to soldering – and for removing excess solder afterwards.
Simon
Simon has summed up my thoughts on this, Mike – you’ve done a great job with those fire escapes, and the mix of “Here’s what I did” and “Here’s what I’m thinking about as I’m doing it” is what brings me a regular reader of your blog.
Your work always inspires. It makes me take a second look at what I’ve done, and ask “How can I improve on this?” That’s exactly what I need.
Cheers!
– Trevor (Port Rowan in 1:64)
Thank you both. The kit is very well engineered and the instructions are an excellent guide. It’s been a simple matter of taking my time and carefully thinking things through. With this project I’ve also reflected on how often we limit ourselves unnecessarily. I could have started working with brass years ago but let my own fears stop me. I can’t help but wonder what kind of work I could be doing now if I hadn’t been so timid.
Mike
“…let my own fears stop me.”
Once again, Mike, your honesty serves everyone in the hobby: it is never too late to try new things. It is possible, for developmental reasons, for it to be too early for a child, maybe, but for an adult, it is never too soon to try to overcome fears.
Talking of which, I have a few of my own “reluctances” to deal with, too!
Simon